 I grew up with pumpkins. As a child I picked them myself from our neighborhood farm or from my mother’s garden. We carved jack-o’-lanterns for Halloween and had pumpkin pie for Thanksgiving dessert. While pumpkins are native to North America and are widely grown here, the popularity of “pumpkin spice” products (which typically contain no actual pumpkin) and the spread of Halloween traditions from the United States have led to pumpkins becoming more available elsewhere in the world. So, for those of you who may have encountered pumpkins for the first time in recent years and been somewhat at loss for what to do with them, here’s a short introduction from someone who grew up with them.
About pumpkins
Pumpkins are a variety of winter squash. In American English, “pumpkin” typically refers to large, orange or yellow squashes with vertical ribs. In other regions, the word applies to winter squashes more widely. Pumpkins tend to be sweeter than other varieties of winter squash, but for most cooking purposes, you can substitute one kind of winter squash for any other.
Pumpkins grow on sprawling vines on the ground. Some varieties are bred to grow larger than others, but you will usually find pumpkins sold in four sizes for three different purposes: decorative (large), carving, sugar, and decorative (small).
Decorative
Either small enough to fit in your palm or gigantic monsters, these pumpkins are just meant for autumnal decoration around the house or on your front steps. The small ones are too small to carve, while the big ones are often irregularly shaped, having slumped under their own weight while growing. Neither is particularly good for cooking, but you’re welcome to try and see what you come up with.
Carving
Early migrants from the British Isles brought their traditions of carving lanterns out of various root vegetables to their colonies on the coast of North America, where they learned to grow the native squashes from the indigenous peoples. Pumpkins soon became the favored vegetable for the fall custom.
The classic jack-o’-lantern pumpkins are about the size of your head or larger. Their flesh tends to be stringy, watery, and not very good for cooking.
 To carve a jack-o’-lantern, start by setting the pumpkin on a flat surface and deciding which side will make the best face. (Pumpkins are often a little lopsided with one half larger or more rounded the other, because of how they lie on the ground while growing.) Next sketch out a face you like with a pencil, marker, or just by making shallow cuts with the tip of a knife.
When you are satisfied with the face, cut the top off in a circle large enough to get your hand in comfortably. It’s a good idea to cut a small diamond-shaped notch half into the top and half into the body of the pumpkin to help you line up the top correctly when putting it back on. Scoop out the seeds and strings from the interior with a large spoon. (Save the seeds if you want to roast them; there’s not much use for the stringy bits.) Scrape away a bit of the flesh on the bottom to make a stable base for the candle.
Carve out the face with a small, sharp knife. In accordance with the principle of “measure twice, cut once,” it’s a good idea to start cutting out the holes a little smaller than you marked them, since you can make them bigger as you go, but not smaller. Once you have all your holes cut through the wall of the pumpkin, cut back the flesh from the inside to widen the holes and allow more light through. It can also help to scrape away at the flesh on the inner surface to make it thinner. (Basically, wherever you have cut through the pumpkin should be wider on the inside than on the outside.)
Take the carved jack-o’-lantern into a darkened room and shine flashlight down through the open top to see how the light comes through and whether there are any places where you need to cut away more of the flesh to get the effect you want. When ready to display, light a tea light or other small candle and put it inside the pumpkin (on a small dish, if you want easier cleanup or worry about the candle burning down), put the top back on, and enjoy!
Once carved, a jack-o’-lantern will only be at its best for a few days, a week at most. Then, as the flesh dries, it will start to shrivel and crumple in on itself. If you want yours to look its best, carve no more than a week before Halloween (or whenever you want to display it).
Sugar
Sugar pumpkins are roughly the size of your head or a little smaller. They are grown to have the best flavor and consistency.
You can peel a raw pumpkin with a sturdy paring knife and cut the flesh into chunks to boil or steam, but I find the best way to prepare pumpkin for cooking is to roast it in halves.
Snap or cut off the stem and split a pumpkin vertically with a small sharp knife. Scoop out the seeds and strings. Save the seeds if you want to roast them. Lay the pumpkin halves cut side up in a shallow baking pan lined with foil or baking parchment. Roast at 400 F / 200 C for 30-45 minutes or until the flesh is soft and the halves no longer hold their shape. (You can also steam pumpkin by setting the halves cut side down in a baking dish with a little water in the bottom.) Let the pumpkin cool until safe to handle. The skin will peel easily away from the flesh, though you may need to cut around the split edges with the tip of a knife. Puree the flesh.
Roasting pumpkin seeds is easy. Separate the seeds from the strings, toss the seeds with a little vegetable oil and salt, spread them out in a pan, and roast them at 400 F / 200 C for about 15 minutes or until they are a nice golden brown. They make a good crunchy snack.
Once you have your roasted pumpkin, here are a couple of my favorite recipes for using it.
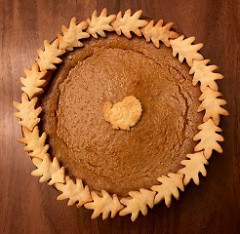
New England pumpkin pie
One pumpkin will yield about two pies with this recipe
Ingredients
- 1 unbaked pie shell
- 3 eggs
- ½ teaspoon salt
- 1/2 cup / 1 dl brown sugar
- 1 cup / 2 dl milk (soy and almond substitutes work fine)
- 1 ½ cups / 3 ½ dl roasted pumpkin
- 2 teaspoons cinnamon
- 1 teaspoon ginger
- ½ teaspoon nutmeg
Directions
- Preheat oven to 475 F / 250 C.
- Prepare the pie shell.
- Beat the eggs lightly.
- Add the salt, brown sugar and milk and mix well.
- Add the pumpkin and spices and mix well.
- Pour the mixture into the pie shell.
- Bake at 475 F / 250 C for 15 minutes.
- Reduce heat to 325 F / 150 C and continue to bake for another 45 minutes or until the filling is well set.
- Let cool and serve with whipped cream, or serve warm with vanilla ice cream.
Pumpkin apple beef stew
Ingredients
- 2 tablespoons flour
- A pinch of salt
- A pinch of pepper
- 1 tablespoon butter
- 1 pound / ½ kilo stew beef
- 1 onion
- 2 potatoes
- 4 carrots
- 2 large apples
- Pureed flesh of one pumpkin
- 2 cups / 5 dl beef stock
- 1 cup / 2 dl dark beer
Directions
- Blend the flour, salt and pepper in a bowl.
- Cut the beef into cubes and roll them in the flour mixture.
- Melt the butter in the bottom of a large, heavy pot and brown the beef cubes.
- Roughly chop the onion. Peel and roughly chop the carrots and potatoes. Core, peel, and roughly chop the apples. Add them all to the pot.
- Add the pumpkin, stock, and beer to the pot.
- Let simmer over low heat for two hours or until the beef is soft and the root vegetables thoroughly cooked through.
Happy fall!
Images: Pumpkins, photography by Infrogmation via Wikimedia. Winking Halloween pumpkin inside – 2014-10-31, photograph by Tim Evans via Flickr. Pumpkin pie, photograph by distopiandreamgirl via Flickr.
How It Happens is an occasional feature looking at the inner workings of various creative efforts.


