We’ve been in Dragonflight for about a year, and we now know that the next World of Warcraft expansion is about a year away, so it seems like a good time to reflect on what we like and don’t like about this expansion.
Erik
I have been very happy with this expansion overall. I enjoy a lot of things about it, and I will be quite content to spend the next year or so in and around the Dragon Isles.
The only thing I really dislike about Dragonflight is dragonriding. I learned how to use the system effectively to get around, and it doesn’t bother me very much any more, but I have never enjoyed it. I find it over-designed and unengaging. It’s nice that, in the right terrain, it gives you a faster way to get from point A to point B, but it doesn’t give me the thrill that it gives a lot of other people. I accept that I am in a small minority with this opinion, and I am happy for everyone else who is enjoying dragonriding, but I’m delighted to be able to go back to the old, regular flying, even if it is slower. The rest of you can zoom and swoop ahead of me as much as you like; I’ll get there when I get there.
I love the Dragon Isles zone design. The artwork of this expansion is beautiful and bold. Every zone has its own identity while also feeling like they belong in the same space together. Having the four main zones in contiguous space, even though separated by cliffs and ridges, is also something I appreciate. The Shadowlands zones were well designed, but the fact that they were all separate from one another at times felt claustrophobic. I don’t much care for Zaralek Caverns, but I can mostly ignore that zone and still have plenty of things to do elsewhere.
I like that this expansion has taken a different approach to quests, dialog, characters, and their stories than we have seen in most of previous WoW. After a year of living with the story of Dragonflight, I think I can put my finger on what makes this expansion different: it is about the nuances of how we respond to trauma. Dragonflight is full of characters living with and reacting to histories of trauma, but different characters respond to that trauma in different ways. I know some players have been frustrated with the Dragonflight story and are annoyed that this expansion is less about Dragons Having Awesome Fights and more about Dragons Having Feelings and Talking, but I really appreciate an expansion that takes seriously the idea that the things we experience can inspire feelings other than rage and reactions other than violence. The last time World of Warcraft tried to engage with the trauma of war and the power of emotions was Mists of Pandaria, which lacked subtlety and came off as shallow and preachy. Dragonflight feels like the Warcraft writers’ room is finally staffed by people who have an adult understanding of life, and I hope that this is a change that sticks.
In terms of systems and gameplay, there has been a lot of good development in Dragonflight. I was a fan of the new talent trees from early on, and my fondness for them has not wavered. Now that I have had some time to play with the new crafting mechanisms, I am mostly happy with them—they sometimes feel overly complicated, but I largely enjoy exploring the new options that the crafting system has opened up. Once I got used to the flightstone/crest gear upgrade system, I’ve found it quite workable, and I really appreciate getting to collect tier sets without having to raid. The proliferation of world quests and events in the open world has sometimes felt bewildering, but for the most part, I appreciate always having something to do.
Eppu
Unlike Erik, I LOVE dragonriding! It’s perhaps my most favorite single thing in Dragonflight. Don’t get me wrong, it was a learning curve, and I still stumble occasionally (especially if my ageing mouse decides to act up). Optimally, I’d like a multi-character dragonriding vehicle (like the Sandstone Drake), so that when we play together I could ride us around and Erik would get the benefit of faster transit without the bother.
I do agree with Erik about the zone design. It’s an absolutely gorgeous expansion. While Zaralek Cavern is not a favorite zone, per se, I quite like the cave-ish-ness of it, for the lack of a better word. Deepholm was already an impressive, underground-cavern-like-enough space with multiple levels of quest areas and subzones. ZC takes the fully matured terrain design to its logical conclusion with an absolutely, breath-takingly amazing underground space that is somehow at the same time huge enough to allow dragonriding between areas and claustrophobic enough to feel constricting. Hats off to the design team from me!
I also agree with Erik on collecting some tier gear without raiding. I have quite enough on my plate at the moment without that particular time sink.
However. Am I the only one who’s driven to distraction by the [multiple expletives removed] constant resetting of talent trees? Sheesh! While I’m all for tweaking and re-tweaking certain aspects of one’s life to one’s satisfaction, a computer game character’s talents isn’t one of them, and certainly not over and over and over. Perhaps I should just go with the suggested talent builds instead, even if it means losing some individuality.
I still find that the world quest refresh rate doesn’t work for me, and events don’t make up for that lack. Because I’m dealing with a more limited gaming time IRL, the last thing I want is to have to track game events’ start times and schedule my playing accordingly. Bleah.
Another aspect that currently doesn’t work for me—and for exactly the same reason as above—is the writers’ room’s penchant for ending campaign quest chains in a dungeon. Although, it sounds like Blizzard is about to change that radically with the new Follower Dungeons coming soon-ish(?) in patch 10.2.5. (In short, the idea is that players form a dungeon group with 1-4 characters and the game generates NPCs for the remaining slots.) I’m rather looking forward to being able to run a leveling dungeon privately, without risking a random jerk (or two or three) with a Looking For Group run.
The new customization options for druids at the barber shop are great fun.
What kinds of thoughts do you have on Dragonflight thus far? Chime in!
My Highmountain Tauren hunter is a jewelcrafter, so I’ve given her a transmog with a suitably gem-studded look. The cool colors of the gems are set off against gold and silver metalwork.
Maybe not a very practical set of garb for stealthily prowling the wilderness, but, eh, what’s fantasy for?
The Finnish Independence Day is tomorrow, on December 6. In honor of a day of rest, here’s a quote celebrating the most important things in life for this Finn—food, clothes, books, and tea:
“Professor Lovell spoke with uncharacteristic warmth. ‘It’s the loveliest place on earth.’
“He spread his hands through the air, as if envisioning Oxford before him. ‘Imagine a town of scholars, all researching the most marvellous, fascinating things. Science. Mathematics. Languages. Literature. Imagine building after building filled with more books than you’ve seen in your entire life. Imagine quiet, solitude, and a serene place to think.’ He sighed. ‘London is a blathering mess. It’s impossible to get anything done here; the city’s too loud, and it demands too much of you. You can escape out to places like Hampstead, but the screaming core draws you back in whether you like it or not. But Oxford gives you all the tools you need for your work – food, clothes, books, tea – and then it leaves you alone.’”
– Professor Lovell in Babel: An Arcane History by R.F. Kuang
Well—cold-sensitive, erudite, reclusive Finn or not, I do have to add a few carefully selected people into that mix. But otherwise it sounds very good. 🙂
Kuang, R.F. Babel: An Arcane History. New York: Harper Voyager, 2022, p. 23.
Image by Eppu Jensen
Serving exactly what it sounds like, the Quotes feature excerpts other people’s thoughts.
Now that we’ve gone through the process of producing raw materials, turning those materials into textiles, and turning those textiles into clothing, we’re rounding out this series with a little math. Given the labor and resources that went into making one outfit, how long would it have taken to make, from start to finish, and how much land did it take to grow everything on?
Our figures here are necessarily approximate. There are too many variables to take them all into account. A good year’s flax harvest or a clumsy hand at wool-carding could make a difference to how fast workers could gather and process materials. We’re also generally working with optimistic estimates. A more thoroughly realistic assessment would have to allow for lost time and material from shrinkage, breakage, wastage, crop failures, inclement weather, and so on. We’re aiming here to get a rough sense of just how much of an investment of labor time and productive land, at minimum, one set of clothes represented in the pre-modern world.
We are also assuming a community of skilled agriculturalists and crafters who know their trade and do not need to be taught or to experiment with processes of production. The passing on of such knowledge to new generations was in itself an important part of historical agricultural and textile production, but we leave that labor out of our calculations.
Our example outfit consists of several pieces, each of which required materials and labor to make:
A long-sleeved linen undertunic reaching to the mid-thigh
A long-sleeved silk overtunic reaching to the knees
Leather footwear
A rectangular wool cloak of about knee-length
To see what it would take to produce this outfit, it is helpful to think backwards: the dimensions of our imaginary wardrobe tell us how much raw material would be needed to make it, which in turn dictates how much work would go into producing that material. We’re imagining this outfit for a person of any gender of about medium height and build. It does not represent any specific historical outfit, and does not belong to any particular place or time; a certain amount of vagueness in the design allows our outfit to reasonably stand in for clothes that could be found in many places and historical eras.
We calculate the following dimensions for the items in our wardrobe:
Undertunic: The undertunic is made from a piece of fabric measuring 210 x 75 cm, which is cut to yield two sleeve pieces and a long piece folded poncho-style for the front and back, with a hole cut for the head. The whole piece of fabric amounts to 1.575 square meters.
Overtunic: The overtunic is similarly cut from a piece of fabric measuring 225 x 90 cm, with two sleeve pieces and one long piece for front and back, amounting to 2.025 square meters of fabric.
Footwear: Our shoes are made from approximately one third of a square meter or leather per shoe, thus two thirds of a square meter for a pair.
Cloak: Our cloak is a rectangle 1 meter by 2 meters, for 2 square meters of wool.
Finished clothes
Undertunic and overtunic – The construction method of these two garments is essentially identical, so the amount of time spent cutting, sewing, and finishing each one is approximately the same. With some reconstructed historical pieces for reference, we estimate that sewing a tunic-style garment such as these takes about 6 to 9 hours. We’ll take the average of the range and estimate that each garment takes 7.5 hours to cut and sew. The two together add up to 15 labor hours.
Footwear – Leather is slower to sew than fabric, but shoes are smaller than tunics. Our shoe models have around 120 cm of seam, and reconstructions show a leather stitching speed of 50 cm per hour. Allowing time for cutting and shaping (but omitting time for fitting to the wearer), each shoe would take about 2 hours to make, thus 4 labor hours for the pair.
Cloak – The cloak is straightforward, since it is simply a rectangular piece of woven cloth needing no sewing beyond the finishing of the edges. If the fabric was woven at a width of 1 meter, the selvages would make the long sides of the cloak; only the short sides would require hemming. At a hand-sewing speed of 1 meter per hour, sewing the cloak would take 2 labor hours.
Total cutting, sewing, and finishing time: 21 labor hours.
Fabrics/leather
Many factors affect the speed at which woven cloth is produced, from the size of the loom to the skill of the weaver. Historical recreations yield a range of weaving speeds from 180 to 255 square cm per hour. For the purposes of our project, we use an estimate of 200 square cm per hour for all types of fabric.
Linen – We need 1.575 square meters of woven linen, or 15,750 square cm, which would take approximately 79 hours to weave. Allowing time for set-up and maintenance of the loom and other necessary by-work, the production of the linen fabric from thread would require around 90 labor hours.
Silk – The calculations are similar for our silk. Weaving 2.025 square meters of silk would take a bit over 101 hours. With additional by-work, we can estimate about 110 labor hours to produce the silk fabric.
Wool – Likewise for our wool, the 2 square meters of wool we need would take about 100 hours to weave, coming to around 110 labor hours with additional work.
The time that it takes to spin the thread needed for weaving depends on how much thread goes into the finished fabric, which is affected by a host of factors: the thickness of the thread, the density of the weave, the width and length of the fabric, and so on. Rather than try to calculate all these possible elements, we work with a rough estimate that each of our fabric pieces required 10 km of thread, a measure based on both modern textile production and historical reconstructions. The further thread needed for sewing is a negligible addition. This rough figure allows for the possibility of variations in how each individual textile was produced while still giving us a reasonable estimate for the total investment of labor.
Dyeing is a further step in the production process. The amount of time it takes to dye cloth depends on what dyestuffs are used, what kind of fabric is being dyed, and what the desired result is. Sourcing dyestuffs and preparing the dye bath also add to the labor. We estimate 10 hours of labor for each piece of fabric, and soaking in the dye bath adds several days of passive production time.
Leather – Leather production is complicated, as we outlined in our post about it. The two thirds of a square meter we need for our shoes could come from a single sheep hide (which typically yield 0.8 square meters of leather), but a lot of preparation and processing would have gone into making that hide into usable leather.
The amount of time it takes to produce leather from a fresh hide is widely variable depending on how the hide is treated and what steps are desirable for finishing it. Much of the time that it takes to prepare leather is passive time, as the hide sits on a rack or in various liquid treatments. For our purposes, we estimate that producing the leather for the shoes took 30 days from beginning to end, during which there were 12 hours of active labor. The passive production time for the leather can overlap with the passive dyeing time.
Total textile and leather production time: 952 labor hours, 30 days passive production.
Raw materials
We are estimating 10 km of thread of each fiber type for our complete outfit, but we must make a further calculation to determine how much raw material went into producing that thread. Threads can be spun at different thicknesses, so to get a sense of how much raw material went into our threads we need to convert length into weight. This conversion is expressed in a unit called tex, which gives the weight in grams of 1,000 m of a thread or yarn. Thinner threads are suitable for finer fabrics, while thicker threads can produce bulkier, rougher textiles. We consulted historical reconstructions to assign texes to our different threads.
Linen – For the linen undergarment, we want a fine fabric that feels good against the skin. For this purpose, we use a tex of 55, which means the 10 km of thread weighs 550 g. To get 550 g of spun linen thread we have to start with a much larger amount of flax, since flax processing removes as much as 90% of the material gathered from the field. Our 550 g of linen thread would require around 5.5 kg of flax.
Modern experiments with historical farming methods have yielded flax harvests of about 1 kg per square meter of field, so 5.5 kg of flax would need only about 5.5 square meters of field to grow in, which would take less than an hour both to plant and to harvest. Flax processing takes several steps, but for a modest amount of flax like this, the total active work time is not great. We can estimate 15 labor hours for flax processing from planting until the fiber is ready to spin. Along the way there is also about 100 days growing time for the plants, and some weeks passive time for retting.
Silk – For the silk tunic, we chose to use a coarser and heavier fabric with a tex of 180, which amounts to 1.8 kg in 10 km of thread. This amount of silk fiber represents the output of around 5,400 silkworms consuming the leaves of some 540 mulberry trees, which would need roughly 2 hectares of land to grow on. If starting silk cultivation from scratch, these trees would need a year to grow to maturity from the planting of cuttings, but we will assume that our silk comes from an established grove, and not count the planting, tree tending, or growing time into our estimates.
What we do need to account for, however, is the growth cycle and tending of the silkworms. Silkworms take 28 days from hatching until they are ready to spin, and require care as they grow. For our purposes, we estimate that caring for the silkworms takes at least eight hours of labor every day, between preparing food, feeding, and management. Once the cocoons are spun, a skilled hand can unreel their fiber quickly. Altogether, we estimate that the production of silk fiber takes 225 labor hours and 28 days of passive production.
Wool – Our wool cloak is a sturdy outer garment meant for warmth and protection against the elements. For this purpose we choose a tex of 500, which makes for 5 kg of wool thread. Historic breeds of sheep yield between 1 and 1.5 kg of wool per shearing, and some of that weight is lost in processing. We estimate that one sheep could yield 0.5 kg of wool fiber fit for spinning, so the 5 kg of fiber needed for our cloak represents one year’s fleece from 10 sheep.
A flock of 10 sheep would need some 10 hectares of grazing land. Sheep are sturdy animals and fairly self-reliant, but they do need tending to keep them safe from hazards and fed during the winter. We are being optimistic (perhaps even unrealistically so) and estimating 100 labor hours for sheep tending in a year. Once the fleece has grown, shearing is quick for a practiced hand. Based on various numbers given by modern shearers using hand shears, we estimate that a skilled shearer would be able to shear our 10 sheep in two hours. For the needs of wool production, then, we count 102 labor hours, a year of passive production, and 10 hectares of land.
Leather – The leather for our shoes could come from one of the sheep in the flock. Since the labor for tending the sheep is already accounted for, and slaughter and skinning are quick processes for an experienced hand, we add only 1 more labor hour to account for the production of the hide for tanning.
Total raw material production time and land needs: 343 labor hours, 1 year passive production, 12 hectares of agricultural and grazing land.
Final calculations
As we have noted many times, a lot of our figures are rough estimates at best. The actual production time for an outfit like ours would depend on numerous real-world factors that are beyond the scope of our project to account for. We are also largely discounting the effects of loss, wastage, and natural or human disaster—a flooded flax field or a neighboring people’s raid on the sheep pastures would throw all our calculations into disarray. Nevertheless, here is a rudimentary good-faith estimate of the time and land investment involved in making a single set of clothes in pre-modern conditions:
Active working time: 1,316 labor hours
Passive time: 1 year
Land requirements: 12 hectares
1,316 labor hours represents over 164 full 8-hours days of work for one person. Some of the work could be shared among several people, but there is a limit to how much efficiency could be gained by division of labor—you can’t make sheep grow fleece faster by adding more shepherds, for instance.
Once raw fibers have been produced, it would take some 973 labor hours to turn those fibers into finished clothes, or nearly 122 full 8-hour days. Even with a worker dedicated full-time to each material type (wool, linen, silk, leather), it would still take more than a month to finish the whole ensemble.
For one outfit, for one person to wear.
Furthermore, every labor hour devoted to clothing production was an hour of labor not available to produce food, construct or maintain buildings, care for children or elders, or engage in other activities that were necessary for the safety and well-being of a community. Clothing was not just something to wear for historical people; it was a statement about the prosperity of their own families and the communities they lived within.
Köhler, Carl. A History of Costume. New York: Dover, 1963.
Mallory, J. P. & Victor H. Mair. The Tarim Mummies: Ancient China and the Mystery of the Earliest Peoples from the West. London: Thames & Hudson, 2000.
Images: Medieval man via Jo Justino at Pixabay. Sample T-tunics by Eppu Jensen. Hand-stitching leather shoes, photograph by Jeff Mandel via ExIT Shoes (CC BY 4.0). Spinning and dyeing in Chinchero, Peru, by Shawn Harquail via Flickr (CC BY-NC 2.0). July, from the Grimani Breviary via Wikimedia (Biblioteca Nazionale Marciana; 1490-1510; illumination on parchment). Small Herculaneum Woman, reconstruction of a marble statue, by Billy Wilson via Flickr (CC BY-NC 2.0).
How It Happens looks at the inner workings of various creative efforts.
In no particular order. Spoiler warnings in effect.
Erik’s random thoughts:
The beginning and ending of this movie felt rushed. The beginning had to get the audience caught up on a bunch of streaming shows that not everyone has seen. The ending felt like it ran out of time to properly wrap up both story elements and emotional beats. As ridiculous and entertaining as the musical number on Aladna was, maybe a minute or two of that runtime could have been better spent on other parts of the movie.
Even though we have watched most of the relevant streaming shows (we’ve seen WandaVision and Ms. Marvel; we gave up on Secret Invasion after they fridged their third woman in as many episodes), I still felt as though I was missing out on some backstory. It’s like there’s half a movie we all missed somewhere along the way.
Iman Vellani is fantastic as Kamala Khan / Ms. Marvel, and she plays brilliantly off both Brie Larson and Teyonah Parris. Carol Danvers may be drivingf this movie’s story, but Kamala is its big, goofy, awkwardly earnest teenaged heart.
I think I counted two white men with speaking roles—three at a stretch if you include the stinger (and not getting into complicated questions about South Asian identities). At the same time, the movie doesn’t make any kind of issue about gender or race; people are just people. We’ve come a long way from the blazing white maleness of Iron Man, even from movies like Black Panther and Captain Marvel which showcased the diversity of their representation and made it a feature of the movie. The Marvel Cinematic Universe is better for reaching a place where a movie full of people who aren’t white men is unremarkable.
With Guardians of the Galaxy, Thor: Ragnarok, and now The Marvels, the MCU is fully committing to the idea that space is big, colorful, weird, and often kind of silly, and I love it.
It was great to see the heroes find their strength not by force of will or emotional epiphany but with practice, and especially by practicing together.
Having flerken kittens tentacle-eat people as an evacuation strategy was already pretty funny, but setting it to a song from Cats was comedy genius.
Eppu’s random thoughts:
It’s too bad that I’ve never read any Carol Danvers stories. It seems there’s a lot of potential in the character—or a lot of comic book storylines that could’ve been tapped—but for some reason she hasn’t gotten another movie for herself; hardly any time at all, in fact, even in the movies that she has been in.
Like MCU’s Peter Parker (Tom Holland), the new Ms. Marvel Kamala Khan (Iman Vellani) actually feels like a teenager. Good job writing and acting that aspect. (So good, in fact, that we almost gave up on Ms. Marvel the series.) Also Khan’s mother Muneeba (Zenobia Shroff) is a treasure!
It’s DELIGHTFUL that we had a proper training montage! I was so satisfied to see how exactly the Marvels figured out how to take advantage of their inadvertent swapping-places-snafu, even to the extent of tagging in and out while juggling.
I guess it’s an indication of how few women I’m used to seeing in the MCU that I kept being astonished at how many female characters we got not only to see but to hear. (“She got lines! And she got lines, too!”)
Teyonah Parris as Monica Rambeau felt the most one-dimensional of the three protagonists. Apart from still suffering from Auntie Carol abandoning her in her childhood, what did she have going on in her life? Not much, as I recall. (Well, work, but don’t they all have that.)
In the MCU, there’s a distinct testosterone-and-big-guns strain (e.g., the Avengers and Iron Man movies), another that’s kookier but mostly sticks with humans (Ant-Man, Doctor Strange), and a third that’s waaaay out there (Guardians of the Galaxy, Thor: Ragnarok). I used to think there’s room for all kinds of takes, from serious to silly, but at least in The Marvels the different veins seem almost to quarrel. The result is a mix where the various styles pull in different directions and don’t quite cohere. I would’ve wanted to see a higher quality, more polished movie. Perhaps the writers are still recuperating from the cumulative effects of the pandemic and the Hollywood writer’s strike. (I know I haven’t bounced back all the way yet, and I didn’t even have to strike.)
Clothing ranges from the very simplest (e.g. ponchos, saris) to very complex designs, including multi-piece, draped, shaped, pieced, pleated, ruched, lined—or a combination of them all.
There are whole books written on the construction and history of clothes. This post covers just the very basics with some examples, keeping our inspiration outfits in mind.
Origins of Sewn Clothing
It’s surmised that the first sewn clothes—made from leather or fur—were constructed with a two-step method: first the pieces were pierced with an awl near their edges, then the sewing material (likely sinew, catgut, or the like) was pushed through the holes by hand to connect the pieces.
Needles made it possible to string thread through the eye and pull the needle and thread through holes made with an awl as a unit, greatly speeding up the process. They were first made from bone, antler, ivory, or wood, later from various metals.
Copper, silver, and bronze needles have been found, for example from ancient Egypt and Bronze and Iron Age Europe. Thicker, larger, and blunter needles were also used to make knotted nets, especially fishing nets. On the other hand, in medieval York, for instance, fine and blunt needles were used on delicate silk fabrics, where parting the filaments was more desirable than splitting them with a sharp tip. Modern and medieval leather needles have a triangular point designed to pierce leather better.
The earliest extant example of complex woven clothing—a cut and fitted garment as opposed to a wrapped one—is the 4th millennium BCE Tarkhan Dress from Upper Egypt.
Whether a sewn garment is made of leather or man-made material (woven, twined, or knitted fabric, faux leather, vinyl, etc.), certain basic similarities are found across a wide variety of garments, be they a hat or hose.
What is considered the front of the material is called the right side; wrong side is the opposite, often less showy or colorful. Some fabrics look exactly the same from both sides; either can be chosen as the right side. These days garment pieces are typically sewn right sides together, i.e., wrong side out, then turned right side out to get a neat finished item. There are some indications that this isn’t true in all cases, though by and large the concept seems valid for earlier periods as well.
Seams that serve a function—joining two or more pieces—are called construction seams. Sometimes garments can have faux seams (decorative seams) inserted purely for symmetry or looks, like some of the medieval textiles found at Herjolfsnes in Greenland.
When making construction seams, narrow bands of material (seam allowances) must be left at the cut fabric edges (raw edges) in order for the join not to unravel immediately. The width of seam allowances depends on the thickness and the propensity of the material to unravel. In modern sewing instructions, seam allowances tend to range between 6-25 mm, with 1 cm / approximately 0,5 inches being very common.
Wider seam allowances are used on thicker fabrics for pragmatic reasons (easier folding) and materials that fray easily like silk, loosely-woven fabrics, or hand-woven fabrics that need it (less inadvertent unraveling).
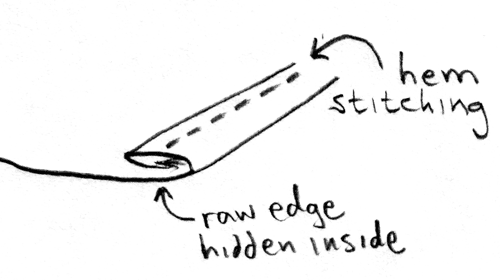
Another type of an allowance is required for treating various outer edges: hat rims or hood face openings; necklines; center-front openings in jackets, coats, or cloaks; edges of side or central slits; armholes (armscyes) in sleeveless garments; sleeve ends (hems or cuffs); bottom hems of trouser legs, skirts, dresses, shirts, tunics, and cloak or jacket-type garments; waists of skirts and trousers. A casing is a tube (which is essentially what a hem is) that is meant to contain a drawstring (or elastic in modern sewing), and can have a hole for operating the cord. These kinds of allowances tend to range from mere millimeters to several centimeters.
The reconstruction of the so-called Viborg Shirt ended up using seam allowances of 25 mm due to the linen’s excessive fraying. Slimmer seam allowances, even down to 3 mm, have been documented as well. They are mostly used in curved areas and with delicate materials. Allowances typically remain inside the finished garment.
Basic hem allowances consist of enough fabric to turn the edge in either once or twice. After turning, the edge or fold is sewn down. The double turn (double-fold) hem stays neater through multiple washes than a single turn one.
Often whether a hem is single or double folded depends on the weight of the fabric: light to medium weight (linen, lightweight wool, heavy silk) can be double-folded, and the heaviest wool gets a single fold. For example, a linen shirt’s neckline might be hemmed by turning the edge in twice and tacking it in place. A cord could be inserted inside the hem prior to stitching the neckline to reinforce it, like in some Iron Age finds from Carelia in modern day Finland and Russia. When hemming or neatening edges, the stitching can run alongside the fold or perpendicularly to it (think buttonholes, for example).
Hems are often finished in some way even when not strictly speaking necessary. Leather, fur, and felted or fulled wool don’t unravel; therefore, their cut edges don’t necessarily need to be finished or hemmed in any way. However, wearers may want them hemmed for durability or neatened with a decorative treatment.
Of course it’s also possible to leave any raw edges unhemmed—indeed, these days a distressed, unfinished edge can be a stylistic or a fashion choice—but the longevity of the garment typically suffers.
Types of Stitches
Not just clothing designs but also the technicalities of sewing (stitches, seams, seam allowances, hems, finishing, embellishments, etc.) can be specific to a culture, era, or current fashion, or vary according to material, especially the closer we come to modern era.
However, it’s often a matter of serendipity which parts of prehistoric or historical clothes from the earliest periods survive. There might not be any clear evidence of techniques characteristic of a particular site or culture at a particular time, and finds from neighboring areas (or nearby eras) need to be considered as suggestions. Furthermore, surviving pieces are often small or very small, especially the earlier the find, so enough details of a seam or hem structure might not survive to form a full picture.
A 9th or 10th century wool textile fragment with a running stitch seam from Lagore, County Meath, Ireland, at the National Museum of Ireland – Archaeology, photograph by Eppu Jensen
Common stitches during the Bronze and Iron Ages include the super-simple running stitch (straight stitch) and its stronger cousin the back stitch. Overcast stitch (whip stitch) was used for tacking down seam allowances and hems, sometimes also for construction seams. Buttonhole stitches (blanket stitches) could also be used for various hems or edges, or to reinforce points where seams come together. Furs in Scandinavia were sewn largely with overcast stitches in the body of a long seam and running stitches in high-stress areas where the seam shouldn’t stretch or give. The woollen Orkney hood (radiocarbon dated to c. 250-615) was patched with chain stitches.
Eight different types of stitches from the salt mines in Bronze and Iron Age Hallstatt, Austria, illustration from Karina Grömer et al., The Art of Prehistoric Textile Making: The Development of Craft Traditions and Clothing in Central Europe (Vienna: Natural History Museum Vienna, 2016) p. 220, fig. 129
In European Bronze and Iron Ages, it was typical to sew wool with linen or wool thread, and it was pragmatic to use the same wool that the fabric was woven with, provided it’s not too loosely spun, too thick, or too rough for the purpose. (Long, uniform, and fine fibers make the best thread, because protruding fiber ends in coarser quality wool make sewing much more difficult.) Similarly, linen was sewn with linen, and silk with linen or silk thread. Linen for sewing might be treated with beeswax to smooth and slicken it.
Types of Seams
Sewing two pieces of material together simply (plain seam) will do if the goal is to get something wearable in a hurry. However, finishing off (neatening) the raw edges of seam allowances or in some way tacking down the seam allowances in their raw state lengthens the life of the garment.
A flat-felled seam (felled seam, run-and-fell seam) completely encases the raw edges of seam allowances. It can be executed with a running stitch for the seam proper plus overcast stitch (possibly also running stitch) to attach the folded edge of the seam allowance. They were used e.g. in Anglo-Scandinavian period England, and Bronze and Iron Age Scandinavia and Germany. Another, very similar seam doesn’t fold in the raw edges, merely presses them to one side and tacks them down.
In a spread seam, the seam allowances are pressed flat on both sides of the seam and their edges are sewn down with either overcast or running stitches.
A handsewn spread seam from Herjolfsnes with overcast raw edges, diagram from Else Østergård, Woven Into the Earth: Textiles from Norse Greenland (Aarhus: Aarhus University Press, 2004) p. 99, fig. 66
Both seam types make a durable join. They also typically show on the right side of the fabric more clearly than a plain seam does (which could be turned into an advantage by using contrasting color thread). Small braids or cords could be used to cover the raw edges at hems or seam allowances, like in some Viking contexts in northern Germany and Ireland.
The wrong side of 11th-century Skjoldehamn-type hood whose seam allowances are finished with yarn, photograph by Madeleine via Maddies Hantverk
Typical Designs
Surviving textile fragments often range from very small to small, so even if we have details of a seam or hem structure, they might not reveal anything about the overall shape or dimensions of a garment.
For a lot of (pre)history, a simple T-style cut seems to have reigned in tunic and dress design, like ancient Roman tunicas, the wool tunic find from the Lendbreen glacier in Norway (dating from 230 to 390), or our example tunic from Egypt with dionysian ornament (from the 5th century). Exceptions clearly do occur, though. For instance, the Tarkhan dress shows distinct signs of pleating on the sleeves and top of the bodice. Also, from Hallstatt there are a number of finds that are shaped (tailored) to the body. A labor-saving technique is to cut the front and back pieces as one, poncho-style.
Ease (for movement) is required from any article of clothing that’s either narrow or tailored. One of the simplest ways to create ease is to use slits, for example at trouser ankles, or cuffs and side seams in shirts and dresses, like in the wool tunic (probably from between 70 and 320) found in the Thorsberg bog in northern Germany. Central seams or central lines at the front and back of a garment are another pragmatic place for slits.
Necklines can also include a slit. For instance, a keyhole-shaped neck opening—essentially a circle with a slit below—is common in historical tunics and shirts. Other common neckline shapes include V-neck, O-neck (crew neck, round neck), and a shallow elongated one that we would now call a boat neckline.
For comfort, many historical tunics insert into the underarms small squares of fabric that fold into triangles (gussets, gores) creating a little extra room.
Underarm gusset for a Regency shift or chemise, photographs by Amanda via 30th Bash Blog, collage by Eppu Jensen
Large triangular gussets or gores can also be inserted at side seams, sometimes also at the center front and back. An alternative way to avoid sewing underarm gores is to cut wider sleeves that taper towards the wrist, like the 11th-century Skjoldehamn tunic from northern Norway.
Pants or trousers are essentially two tubes running from the waist to the hem joined together by the crotch. Ease in pants is gained by fitting the shape to the wearer carefully, especially at the joints (crotch, knee, and ankle). An alternative is cutting a large enough circumference that ease is not needed, in which case the waist (if not the hems as well) needs to be gathered and either belted or cinched with a casing and cord.
A pair of woven pants belonging to a rider found from Yanghai, Turfan, China, and dated to c. 1200-1000 BCE, photograph via Helsingin Sanomat
Cloaks or mantles were typically either rectangular, circular, or semicircular. The former two types were apparently known already in ancient Egypt, while the so-called blue Kunigunde mantle (early 11th century Germany) is a gorgeous embroidered example of the latter. A well-attested outer garment in ancient Greece and Rome was the paenula, a poncho-like bell-shaped cape, that was worn for centuries.
As with other design features, clothing lengths vary from era to era, culture to culture, class to class, group to group, function to function. There are many cases where the basic shapes are the same and the decorative features, including color, separate types of wearers from each other. Male garments tend to be shorter than female ones, but not uniformly.
In cutting garment pieces from fabric, economy reigned and wastage was minimized. We have extant clothing remnants where selvage edges and raw edges have been combined side by side, so clearly a desire to use as much of the fabric as possible existed. (Modern sewing instructions advise cutting out selvages altogether.) Garment parts that remain invisible underneath the overlayers could be less fine and might have been made from rougher materials or reused from older clothes.
Sewing Speed
All sewing was done by hand until the sewing machine was invented around the middle of the 19th century. While not as labor-intensive as spinning and weaving, handsewing was still a significant investment of time, especially the more decorative types. It’s no wonder that clothes were often mended and reused until they were falling apart, and at the end of their lives put to use as modest utility textiles or rags.
It’s nearly impossible to find comprehensive information on how long sewing a garment took before there was an interest in collecting and publishing statistics (in the 1800s or so). Research and experimenting give the best insights we have.
In one experiment, during the reconstruction of the fur outfits (kaftan and cape) belonging to the 900s male and female burials from Bjerringhøj and Hvilehøj, Denmark, sewing a 10 cm seam with two different types of needles was compared. A modern steel needle was significantly faster at approx. 7 minutes, while a replica bronze one took 12 minutes. One meter of seam would, with these speeds, require between 1 hour 10 minutes and 2 hours.
In another experiment, the reconstruction of the 11th century Viborg Shirt in linen took just under 17 hours to sew. However, there are some complex features in its design: the body (shoulder to waist area) is lined both front and back, the square neckline is fairly involved, and there are several seams attaching the outer fabric and the lining together (quilting), so it would’ve taken much longer than a comparably-sized plain T-tunic to sew.
A modern re-enactor handsewing a Viking Age replica woman’s underdress estimated her speed to be about 1 meter per hour for a total of about 25 hours, entirely by hand. Another cited a Tudor era doublet for a 5-year-old boy, half sewn by hand and half by machine, having taken approx. 36 hours of work. The latter did require careful fitting and was lined, so an unlined, much simpler project should cut that time in half if not more.
A very rough estimate for sewing fabric tunics might therefore be 6-9 hours, and naturally more for dresses or anything else with long or complicated seams. Leather is a little slower to handle, but it might be possible to save time by skipping the hemming step, depending on the garment and its purpose. As always, rough-and-ready uses require much less effort and time investment than high-status items.
How It Happens looks at the inner workings of various creative efforts.
The greater blue-eared glossy-starling (Lamprotornis chalybaeus) is a common bird in parts of Africa. It’s as handsome as handsome gets—absolutely gorgeous!
This stunning starling breeds in a band of land stretching from Senegal in the west coast all the way east to Ethiopia, and south again through eastern Africa to northeastern South Africa, northern Botswana, southern Namibia, and northern Angola. They live in subtropical forests, savanna, and shrublands.
I’ve always found the English name starling lovely—certainly lovelier than the Finnish one (kottarainen)—but the looks of the common starling haven’t, sadly, quite lived up to the name in my mind. Now, the greater blue-eared starling is quite something else! It would be so remarkable to see a turquoise-blue murmuration in a fantasy production, wouldn’t it?
The Visual Inspiration occasional feature pulls the unusual from our world to inspire design, story-telling, and worldbuilding. If stuff like this already exists, what else could we imagine?
Leather is produced from a wide variety of different animal skins, from both wild and domesticated creatures.
Origins of Leather Production
It’s unclear when humans started wearing clothes—and what, precisely, can be identified as clothes in archaeological finds—but the first garments were likely some forms of hide or leather wrappings. Tools for scraping hides date back at least to 120,000 BCE, probably already some hundreds of thousands of years earlier, while studies based on body lice suggest clothing might have been adopted around 170,000 BCE.
The oldest archaeological remnants to do with sewn apparel are bone awls and needles, the oldest of which date back to roughly 80,000 BCE. Using them as evidence, it has been estimated that the earliest clothes made from animal skins were produced approximately 70,000-30,000 years ago, but the question is still open.
However, a recently published study of small sandal-like prints, found in sandstone at three places along South Africa’s Cape coast, discussed not just the sandal prints, but also indications of strap attachment points within the prints. None of the three sites have been dated yet, although nearby sites suggest that they may be from around 70,000 to 130,000 BCE. If confirmed, that’s a staggeringly long time for humans to have been constructing multi-part coverings for themselves.
The oldest extant shoe we do know of (the so-called Areni-1 shoe) was found in Armenia and dates back to the local Copper Age, 3600-3500 BCE. It was made of leather and various grasses. The footwear Ötzi wore, from 3300 BCE or so, involves similar materials: a leather covering over sock-like inners made of lime or linden bast. He also wore two coats, a belt, leggings, a loincloth, and a cap, all carefully sewn from leather or skins of various kinds.
Bog deposits can preserve details that don’t survive in regular burials. For example, the 2nd century BCE Huldremose woman from Denmark had a cape made from several dark brown sheep skins. This outer cape had a collar of light-colored sheep skin, and the wool side was turned out. Underneath she wore another cape, made from 11 small dark lamb skins with the wool side in.
Types of Leather
Domesticated mammals like cattle, sheep, goat, and pig yield most modern leather, although leather can also come from wild animals such as deer, squirrel, and rabbit, as well as non-mammals like ostriches, lizards, and fish.
There is quite a variety of vocabulary connected with leather, starting with the types of raw material. Pelts are typically undressed and still contain the hair, fur, or wool. The word hide is used of pelts from larger animals (cattle, moose, etc.), while those from smaller animals (rabbits, pigs) are sometimes referred to as skins. Fur, when speaking of materials, refers to a processed hide with the hair retained. Treated hides or skins without fur or hair are leather proper, but you do also see the word leather as a generic term for any kind of animal skin product.
These days, tanneries buy quality-graded raw hides. Issues like holes, deep cuts, scars, large abrasions, discolorations, skinning machine damage, remaining hair, and grain inconsistencies affect the grading. Grades are numbered from one to three (best to weakest quality), in addition to which there is hide considered untannable.
The quality and characteristics of leather vary based on where in the hide it comes from. The shoulders generally have a firm yet malleable and flexible feel. The rump areas are the thickest and firmest in a hide and make good sturdier items such as heavy belts. The areas ranging from the spine towards the belly are some of the best leather available in a hide, while belly leather is a little softer and stretchier than others.
Like human skin, animal skin is composed of layers. In modern production, leather is usually split to gain materials with different qualities, most commonly into outermost layers (yielding e.g. full grain, top grain, corrected, or nubuck leather) and lower layers (e.g. split leather, suede). Both kinds can be treated further.
The treatment can also give a leather its name. For instance, while both have a nap-like soft finish, nubuck is considered top grain and suede a split. Chamois is a soft pliant leather produced from the skin of the chamois (a species of mountain goat) or from sheepskin. Patent leather has a high-gloss coating and was developed in the 1700s.
Collecting Materials
The only way to get leather is to skin something. Skinning is recommended as soon as possible after death (because otherwise the hide will start decomposing in a matter of hours and because it makes the following steps easier). Smaller animals (e.g. squirrels, minks) can also be skinned as a tube.
The amount of leather that comes from one animal naturally depends on the size of the animal and the condition of its hide. In modern leather processing, a typical cow hide yields 4.6 square meters of finished leather, while a sheep hide yields 0.8 square meters. Hides in poor condition may have to be trimmed to be usable.
Craftsmen cure and prepare to cut leather used in the manufacturing of Fulany conical sun hats in Bamako, Mali, photograph by Emilio Labrador via Flickr (CC BY 2.0)
Skinning is relatively quick, but it is only the first step in leather production. The preparation, preservation, and treating the hide takes many more steps that may amount to months of labor before the leather is ready to be cut, fitted, and finished.
Processing Leather into Useable Forms
The core of leather processing is called tanning. Tanned material is flexible and doesn’t rot. During tanning, the protein structure of a pelt is chemically altered to protect it against moisture and microorganisms. It basically means the replacement of natural fluids and fats with preservative agents (minerals, tannic acids, and fats or oils).
There’s an enormous variety of traditional tanning methods, so the description below is bound to be cursory.
Prior to tanning, the fresh raw skin (green hide) needs to be prepared. It involves fleshing (removal of meat and fat by scraping or pounding) plus dehairing if desired (soaking in water, urine, or an alkaline solution), then the hide is stretched over a frame and dried.
Raw hides dry out hard and inflexible, and they can also putrefy if they get wet again. Green hides can be cured to prolong the time they can be effectively treated in. It often involves salting (or, in modern processing, applying other chemicals) to remove excess water. (Compare this to curing meat with salt to preserve it.)
There are many other options for pretreatment, for example liming and deliming (a chemical process to remove epidermis, hair roots, undesired fats, and soluble protein), bleaching, and pickling and depickling (altering the pH value).
So-called vegetable tanned leather is treated with tannins from plants. Tree bark or leaves are an old, convenient source for tannic acids. Tannin baths derived from different barks produce different coloring on the leather (e.g. birch yields a yellowish and spruce a darker brown).
Impregnating leather with various fatty or oily solutions (fatting, fat curing, fat liquoring) for preservation and waterproofing is an age-old option. It has the benefit of softening the leather as well.
Smoking or smoke tanning is another possible processing method. Formaldehyde from the smoke offers some microbial and water resistance. For instance, fat cured and smoked chamois leather (made by oil tanning where fish oil or other fatty substances are pounded in until they have replaced the original moisture) can be washed and wrung almost entirely dry.
If desired, some finishing processes like buffing, waxing, or embossing can be applied. Dyeing leather is possible during or after tanning. Some methods or colors are more difficult to achieve, others easier. For example, vegetable tanned leather can be dyed black even at home simply with vinegar and rust. Henna-dyed leathers apparently tolerate rubbing quite well, while their lightfastness is only moderate.
As the processing times of various methods vary so widely, it’s extremely difficult to estimate the time devoted to tanning in the past. Early periods presumably largely favored simpler approaches, like a mostly mechanical treatment (working the animal’s own natural fats or brains into the skin) plus smoking. It’s probably fair to estimate from a few days to a week even for this method of tanning.
Alternatively, tanning leather thoroughly in a tannin bath can take months. Due to the extensive time commitment, in later Iron Age Finland vegetable tanning was likely used for a handful of days only (essentially to dye the leather), and the tanning process was finished with a fat treatment.
Typical Uses of Leather in Clothing
Leather garments are durable, nearly waterproof, and pragmatic for many demanding tasks. Footwear is an obvious choice due to the durability of leather: boots, shoes, moccasins, and slippers, sometimes lined with felt or with fur inside, are still being made. (Armor is another, but that’s beyond our focus here.)
Different furs and leathers are suited to and have historically been used for different purposes. Moreover, even though leather, hide, and fur might have been sourced from the same animal, the uses that those materials have been put to often differ both in prehistory and historical eras. Leather was and still is used for clothing meant to endure harder wear, while fur is reserved for warmth and a show of luxury.
As an example, from around 1800 BCE onwards, the residents at the various sites around the Tarim basin in Xinjiang, northwestern China, wore a variety of leather garments: footwear (some of them dyed), skirts with the fur turned inside, sheepskin trousers, leather coats (e.g. of sheepskin), and mittens (or possibly a falconer’s glove or the like). An interesting coat variant from the Qizilchoqa cemetery, approx. 800-530 BCE, had the fur turned inside with integrated gloves (i.e., sleeves continuing as mittens).
In the Nordic countries during the Iron Age, sturdy goat leather was often used for footwear, or if fur was desired, seal, deer, moose, or cow hides were selected, especially from around the legs. Thicker cow or calf leather was picked for belts and shoe soles. Soft, thin chamois was made from deer or goat, and thicker types from moose. Fur clothes were made from summer deer, fall reindeer, or sheep pelts, all of which might also be dehaired and used as leather for shirts, pants, or hoods.
Fat-treated leather garments tolerate wet conditions well. For Nordic Iron Age sailing crews, the layers closest to skin were probably wool, since it stays warm even when wet, but the outer layers may have been made from vegetable tanned goat or sheep leather and fatted leather. By processing a hide with a mixture of tallow and tar it’s possible to get it nearly waterproof.
Xiongnu Leather Robe, Han period (roughly 200 BCE to 220 CE), photograph by Gary Todd via Flickr (CC0 1.0 Universal), edited by Eppu Jensen
During historical periods leather was also used for gaiters, headwear, and fur leggings, for example. Other garments commonly made from leather include cloaks or capes, while fur has long been used as lining or trimming for woven cloaks or coats. For instance, the high-status 900s CE man from Bjerringhøj, Denmark, wore a cloak of beaver skin decorated with tablet-woven bands of wool, and a woman from Hvilehøj, Denmark (also from 900s CE), had a fur cape as well. Hers was made of forest marten edged with beaver skin and various bands of wool and silk. She also wore shoes of fine goatskin with hair on the outside.
A traditional Sami beaska (in Finnish peski, a kind of an anorak) requires about 5-7 reindeer skins to make. In the coldest season, the Sami sometimes wore two beaskas, the one closest to the body with fur facing in and the outer one with fur facing out.
A Sami woman’s wedding beaska from Enontekiö, Finland, c. 1915-1916, made from reindeer fur and wool, photograph by Saamelaismuseo Siida via Finna (CC BY-NC-ND 4.0)
Also utility products out of leather have long been common. For millenia, leathers, hides, or furs were used to wrap bodies in for burial or placed underneath a body in a grave. Other examples include tents and other shelters, cushions, drum skins, saddles and reins, scabbards, sheaths, fur or leather belts and belt pouches, and bags of various kinds. There are finds from Iron Age Finland where fur was used even to line knife sheaths.
A Viking leather pouch and belt made worn by historical reenactor, photograph by Can Pac Swire via Flickr (CC BY-NC 2.0)
These days, lamb and deerskin are chosen for soft leather in more expensive uses, and deerskin for work gloves and indoor shoes. It should be noted that fluctuations in heat and humidity can ruin a leather garment. They should not be exposed to high heat, and it’s recommended to spread them out to dry for best longevity.
How It Happens looks at the inner workings of various creative efforts.
Tales of haunted places are a nearly universal part of human experience. Ghost stories can be one of the ways in which we remember the past, especially traumatic or painful parts of it. Even in ancient Greece there were legends of hauntings connected with the site of the battle of Marathon.
Normally, in ancient Greece, the bodies of fallen soldiers were brought back to their home city after the battle and buried wherever their families buried their dead, but an exception was made for the fallen of Marathon in recognition of the exceptional nature of the battle. The dead of Marathon were buried on the site of the battle and an enormous earthen mound raised over their tomb.
The travel writer Pausanias reported local legends about ghostly apparitions around the tomb mound some six centuries after the event (and a warning to any would-be ghost hunters):
Every night there can be heard the sound of horses neighing and men fighting. It has never done anyone any good to go looking for these manifestations on purpose, but those who happen upon the scene by chance do not suffer the spirits’ wrath.
Pausanias, Description of Greece 1.32.4
(My own translation)
If you’re enjoying some ghost stories this Halloween, know that you’re in good company and part of a long tradition.
History for Writers looks at how history can be a fiction writer’s most useful tool, from worldbuilding to dialogue.


You must be logged in to post a comment.