“Show, don’t tell” is one of the old chestnuts of writing advice. Like most such nuggets of wisdom, it has value, but there are also good cases for ignoring it, even sometimes doing the exact opposite.
Telling, as a writer, means giving the reader a direct and straightforward description of a character’s thoughts, emotions, or personality. Showing means providing the reader with tangible evidence of the same things without stating them outright. “She was nervous” is telling. “She fidgeted and took hesitant, aimless steps while her eyes darted about, refusing to focus on anything in the room” is showing.
Showing is valuable in writing because it engages the reader’s imagination. It makes the characters’ experiences more relatable, but also requires the reader to pay attention and figure things out for themselves. When we read about a character fidgeting and taking hesitant steps, we discover her nervousness for ourselves rather than have it served to us. Making little discoveries like this is part of the joy of reading, and that joy is diminished if we have nothing to figure out.
While it’s useful to show your readers things, there is also a good case for telling things sometimes. You don’t want your readers to have to figure out everything for themselves. For one thing, that’s exhausting. For another, it divides your readers’ attention and keeps them from focusing on the elements of the story that you want them to pay attention to. It’s perfectly fine to write “She was nervous,” if the character’s nervousness isn’t the point of the scene.
Jane Austen uses telling rather than showing to excellent effect in her novel Emma. The very first line of the novel tells us exactly who Emma is:
Emma Woodhouse, handsome, clever, and rich, with a comfortable home and a happy disposition, seemed to unite some of the best blessings of existence; and had lived nearly twenty-one years in the world with very little to distress or vex her.
As the novel goes on, we get plenty of chances to observe these qualities in Emma for ourselves, but Austen starts by telling us straight out who her heroine is. By giving us this portrait of Emma up front, Austen frees us from having to figure her out for ourselves and allows us to focus our attention on the world around her, discovering the characters who make up her life bit by bit through their own interactions with handsome, clever, rich Emma.
At the same time, the straightforward way Austen introduces Emma may trip us up. As the novel unfolds, Emma discovers that she has misunderstood who her friends and neighbors in Highbury really are. By telling us about Emma instead of showing her to us, Austen lulls us as readers into expecting similarly straightforward introductions to the other characters, and so we get to go along with Emma’s own discoveries rather than getting ahead of her.
Showing is a skill you need as a fiction writer, but knowing when to tell is a valuable skill, too.
How It Happens looks at the inner workings of various creative efforts.
A lot of international foods are available now in Finland that may have been hard to find decades ago, but one food that is still elusive is bagels. While there are some bakeries making good bagels here, they are few and far between, and certainly not as convenient as our neighborhood bagel shop was back when we lived in Massachusetts. So I have decided to try my hand at making bagels myself.
I started by looking through my cookbooks. Astonishingly, there’s not a single bagel recipe in any of the cookbooks on my shelf. Even my trusty old Joy of Cooking let me down here, so to the Internet it was! Fortunately, there’s no end of bagel recipes online. After looking at a number of recipes, I settled on one that seemed straightforward and clear, this New York-style bagel recipe from the Sophisticated Gourmet. (One thing I particularly appreciated about this recipe is that it gives both American and metric units. I’ve gotten used to doing conversions, but it’s nice when you don’t have to.) With that recipe as a base and a few tweaks to suit my own kitchen, I made my first test batch of bagels.
And they were good!
So, here’s my process, in case you want to try the same. This recipe is for a plain white wheat bagel without inclusions or toppings. Adjust as you like to make your own preferred type of bagel.
I have these white cotton home trousers that Eppu made for me years ago. They are very comfortable, and I wear them all the time when just hanging out at home. I wear them so much, in fact, that they are starting to get worn through in places and need repair. I got a rip at the corner of one pocket opening, and here’s how she fixed it.
Eppu is good at making invisible repairs to our clothes, but she decided to try something different this time. Instead of hiding the patching, she made it a feature. There’s a recent trend for visible mending, including use of the Japanese stitching technique called sashiko, and this was one of Eppu’s test pieces to try out the approach. Just a little experiment to see how it would come out and how it would wear on a piece of clothing that gets used so much.
I think the results are great. Now I’ve got the sun in my pocket, all day long!
Image by Eppu Jensen
How It Happens looks at the inner workings of various creative efforts.
This coming weekend is Ropecon, the major role-playing convention in Finland and one of the highlights of our year. Eppu and I always attend, whether it’s to play games, run games, catch up with friends, attend talks and workshops, or disco the night away.
As part of our Ropecon routine, once the weekend is over and we’ve recovered a bit, we compare notes and write down things we’ve learned from the experience to make the next year’s con easier, more manageable, or more fun. Here’s a few of the things I’ve learned over the years that have made my con experience better.
Since we live close enough to the convention site to go there and back again each day, here are some handy ways to manage home life for the weekend:
Make one big pot of soup or some other warm dish (chili, borscht, beef stew, etc.) and one big bowl of salad to leave in the fridge over the weekend. We can dip into one or both whenever we’re at home and need a low-effort meal.
Run and empty the dishwasher the morning of the first day of the con. Then just pile in dishes as you use them over the weekend and run it when it gets full and you have time.
Have a big piece of paper that says CLEAN on one side and DIRTY on the other; leave it on top of the dishwasher with the appropriate side up. When you’re half asleep in the morning and in a rush to get to your first panel, it saves time and brain power to not have to stop and think about when the dishwasher was last run or emptied.
Have a good store of salty snack foods on hand (chips, pretzels, peanuts, etc.), because you will be sweaty and dehydrated and need a quick electrolyte restorer.
Wash and chop a big pile of vegetables like cucumbers, carrots, cherry tomatoes, peppers, etc. on the day before the con for easy-to-grab healthy snacking, too.
Some advance prep also makes the at-con experience easier:
Make a daily schedule for the con with an hour-by-hour breakdown of what you want to do, including room numbers. If you’re not sure what you’ll be doing at any given time, write down all the possibilities you’re considering. Share this schedule with anyone you want to meet up with at the con, so they have an idea of where to look for you and when you’ll be free.
Write out your contact information (and your partner’s) and make that your phone lock screen for the weekend.
Leave a comfortable change of clothes in the bathroom at home every morning before you leave for the con, since you might want an immediate shower and change as soon as you get home.
Leave an empty drying rack in the bathroom, too, so you have an easy place to hang sweaty gear to dry before putting it in the laundry.
And some notes for making the con experience as fun and comfortable as possible:
If you have one warm, full meal a day, you can get through the rest of the day by snacking when you have free time. Make sure to drink plenty of water as well.
Pack a change of clothes in a bag with a zipper closure and leave that at the coat check in case you need to change during the con. Include a dry wash cloth in a plastic bag, so you can wipe yourself down if necessary.
There will always be someone at a game who needs to borrow dice, so bring an extra set for lending out.
For games that I run, print up a sign with the game name in big, visible letters that can stand on the table so players can easily find me.
If you’re on your way to Ropecon or have another con in your future, I hope you have an easy and wonderful time!
How It Happens looks at the inner workings of various creative efforts.
This is so epic and ingenious! Jen and John at Epbot built in their home a DIY version of the illusionary labyrinth wall from the movie Labyrinth for a theme party. You remember, the one with the worm? “Come inside, meet the missus!”
Here are a couple of behind-the-scenes photos:
As you can see, they built a small temporary wall to make a small hallway to step into. The opening between the rooms was partially covered with faux brick panels. Careful painting and lighting complete the illusion. (They even added the worm! Squee!)
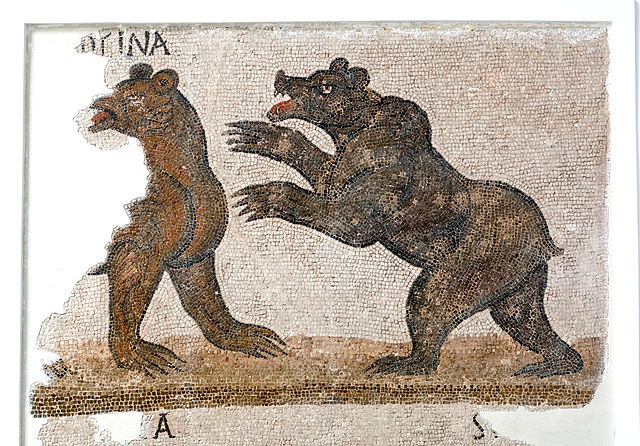
If someone out there is looking for a good plot for an ancient Roman mystery thriller, here’s a tip. There’s a famous case in classical Roman law according to which it is possible to get someone killed and face no legal consequences. The catch is: you have to get lucky, and you have to use a wild animal like a bear.
To start with, we have to lay down a few fundamentals of Roman law: dominium and possessio. Dominium means ownership, the absolute right to control a particular piece of property. Possessio, unsurprisingly, means possession, the direct control of property.
In most cases, people have both dominium and possessio at the same time. You own a vase, which you keep in your house as decoration on a table—you have both the legal right to that vase (dominium) and direct physical control over it (possessio). It is also possible to have one without the other. If you lend that vase to a friend so they can decorate their house for a party, you still own the vase (dominium) even without possessio; as long as your friend has it in their house, they have possessio, but that doesn’t give them dominium.
Now, if someone uses that vase to smash someone over the head and kill them, it doesn’t matter who owned or possessed the vase. Inanimate objects are not responsible for what people do with them. The person who did the smashing is liable for the results of their actions. Neither an owner nor a lawful possessor is liable for what other people do with their property.
With animals, though, we get into a more complicated area. Sometimes people can directly provoke animals to cause harm, like spooking a herd of cattle into a stampede or siccing a dog on another person. In those cases, Roman law recognizes that the person who provoked the animals is responsible for the harm they caused, in the same way that someone who picks up a vase and smashes it over someone else’s head is responsible for the damage done by the vase. Yet animals can also act on their own initiative. A charging bull or biting dog can ruin someone’s day without a person directly commanding it, and you can’t sue an animal for the damage it causes.
To deal with cases where animals caused harm without direct human intervention, Roman law provided the action of pauperies. In a lawsuit for pauperies, the owner of an animal was held legally liable for harm the animal did when acting on its own nature. It didn’t matter whether the owner caused the animal to act, or was even present when the damage was done. The person who had dominium of an animal was responsible for what that animal did. (There was a limit, however: if a person was sued for damages done by their animal, they could escape all liability by handing over the animal in question to the wronged party. In this way, the limit of liability was the value of the animal itself.)
For domesticated animals, pauperies provided a degree of legal recourse, because a domestic animal always belongs to someone. Even if your bull breaks out of its paddock and goes on a rampage through town, it’s still your bull. Once the bull is off your property, it is no long in your possessio, but you still have dominium and the legal liability that goes with it.
Wild animals are a different case. Under Roman law, you can have dominium over a wild animal only so long as you have possessio of it. If you are hunting a deer and catch it in a trap, the deer belongs to you as long as it is in your trap or if you can get a rope on it to wrangle it back to your property, but if it breaks free and runs off through the woods, you loose your claim to it unless you catch it again. If another hunter kills the deer while it is running from you, you have no recourse against them, because as soon as the deer is out of your possessio, it is also out of your dominium.
So far so good. All of these legal principles have a sound practical purpose and make logical sense. When we put them together, though, an unexpected result emerges.
Suppose you have a bear in a cage. A bear is a wild animal, like a deer, so as long as it is in your direct physical control, it belongs to you. If the bear reaches out of its cage and mauls someone, you are legally on the hook for damage because it is an animal in your dominium. But what if it gets out? Once the bear escapes its cage and is running free, you no longer have direct physical over it, so you lose possessio. Because it is a wild animal, not a domestic one, as soon as you lose possessio, you also lose dominium. On one hand, that means that if someone else captures or kills the bear, you have no legal right to sue them or demand they return it to you. On the other hand, you also have no legal liability for any damage the bear does.
It would take a lot of luck to pull off, but if you can concoct the right scenario where a dangerous animal gets loose at the right time and kills the person you want to target, under Roman law, you would be free and clear.
Image: Roman mosaic of a bear, photograph by Jerzystrzelecki via Wikimedia (currently Bardo Museum, Tunisia; Roman period; tile mosaic)
History for Writers looks at how history can be a fiction writer’s most useful tool, from worldbuilding to dialogue.
Now that we’ve gone through the process of producing raw materials, turning those materials into textiles, and turning those textiles into clothing, we’re rounding out this series with a little math. Given the labor and resources that went into making one outfit, how long would it have taken to make, from start to finish, and how much land did it take to grow everything on?
Our figures here are necessarily approximate. There are too many variables to take them all into account. A good year’s flax harvest or a clumsy hand at wool-carding could make a difference to how fast workers could gather and process materials. We’re also generally working with optimistic estimates. A more thoroughly realistic assessment would have to allow for lost time and material from shrinkage, breakage, wastage, crop failures, inclement weather, and so on. We’re aiming here to get a rough sense of just how much of an investment of labor time and productive land, at minimum, one set of clothes represented in the pre-modern world.
We are also assuming a community of skilled agriculturalists and crafters who know their trade and do not need to be taught or to experiment with processes of production. The passing on of such knowledge to new generations was in itself an important part of historical agricultural and textile production, but we leave that labor out of our calculations.
Our example outfit consists of several pieces, each of which required materials and labor to make:
A long-sleeved linen undertunic reaching to the mid-thigh
A long-sleeved silk overtunic reaching to the knees
Leather footwear
A rectangular wool cloak of about knee-length
To see what it would take to produce this outfit, it is helpful to think backwards: the dimensions of our imaginary wardrobe tell us how much raw material would be needed to make it, which in turn dictates how much work would go into producing that material. We’re imagining this outfit for a person of any gender of about medium height and build. It does not represent any specific historical outfit, and does not belong to any particular place or time; a certain amount of vagueness in the design allows our outfit to reasonably stand in for clothes that could be found in many places and historical eras.
We calculate the following dimensions for the items in our wardrobe:
Undertunic: The undertunic is made from a piece of fabric measuring 210 x 75 cm, which is cut to yield two sleeve pieces and a long piece folded poncho-style for the front and back, with a hole cut for the head. The whole piece of fabric amounts to 1.575 square meters.
Overtunic: The overtunic is similarly cut from a piece of fabric measuring 225 x 90 cm, with two sleeve pieces and one long piece for front and back, amounting to 2.025 square meters of fabric.
Footwear: Our shoes are made from approximately one third of a square meter or leather per shoe, thus two thirds of a square meter for a pair.
Cloak: Our cloak is a rectangle 1 meter by 2 meters, for 2 square meters of wool.
Finished clothes
Undertunic and overtunic – The construction method of these two garments is essentially identical, so the amount of time spent cutting, sewing, and finishing each one is approximately the same. With some reconstructed historical pieces for reference, we estimate that sewing a tunic-style garment such as these takes about 6 to 9 hours. We’ll take the average of the range and estimate that each garment takes 7.5 hours to cut and sew. The two together add up to 15 labor hours.
Footwear – Leather is slower to sew than fabric, but shoes are smaller than tunics. Our shoe models have around 120 cm of seam, and reconstructions show a leather stitching speed of 50 cm per hour. Allowing time for cutting and shaping (but omitting time for fitting to the wearer), each shoe would take about 2 hours to make, thus 4 labor hours for the pair.
Cloak – The cloak is straightforward, since it is simply a rectangular piece of woven cloth needing no sewing beyond the finishing of the edges. If the fabric was woven at a width of 1 meter, the selvages would make the long sides of the cloak; only the short sides would require hemming. At a hand-sewing speed of 1 meter per hour, sewing the cloak would take 2 labor hours.
Total cutting, sewing, and finishing time: 21 labor hours.
Fabrics/leather
Many factors affect the speed at which woven cloth is produced, from the size of the loom to the skill of the weaver. Historical recreations yield a range of weaving speeds from 180 to 255 square cm per hour. For the purposes of our project, we use an estimate of 200 square cm per hour for all types of fabric.
Linen – We need 1.575 square meters of woven linen, or 15,750 square cm, which would take approximately 79 hours to weave. Allowing time for set-up and maintenance of the loom and other necessary by-work, the production of the linen fabric from thread would require around 90 labor hours.
Silk – The calculations are similar for our silk. Weaving 2.025 square meters of silk would take a bit over 101 hours. With additional by-work, we can estimate about 110 labor hours to produce the silk fabric.
Wool – Likewise for our wool, the 2 square meters of wool we need would take about 100 hours to weave, coming to around 110 labor hours with additional work.
The time that it takes to spin the thread needed for weaving depends on how much thread goes into the finished fabric, which is affected by a host of factors: the thickness of the thread, the density of the weave, the width and length of the fabric, and so on. Rather than try to calculate all these possible elements, we work with a rough estimate that each of our fabric pieces required 10 km of thread, a measure based on both modern textile production and historical reconstructions. The further thread needed for sewing is a negligible addition. This rough figure allows for the possibility of variations in how each individual textile was produced while still giving us a reasonable estimate for the total investment of labor.
Dyeing is a further step in the production process. The amount of time it takes to dye cloth depends on what dyestuffs are used, what kind of fabric is being dyed, and what the desired result is. Sourcing dyestuffs and preparing the dye bath also add to the labor. We estimate 10 hours of labor for each piece of fabric, and soaking in the dye bath adds several days of passive production time.
Leather – Leather production is complicated, as we outlined in our post about it. The two thirds of a square meter we need for our shoes could come from a single sheep hide (which typically yield 0.8 square meters of leather), but a lot of preparation and processing would have gone into making that hide into usable leather.
The amount of time it takes to produce leather from a fresh hide is widely variable depending on how the hide is treated and what steps are desirable for finishing it. Much of the time that it takes to prepare leather is passive time, as the hide sits on a rack or in various liquid treatments. For our purposes, we estimate that producing the leather for the shoes took 30 days from beginning to end, during which there were 12 hours of active labor. The passive production time for the leather can overlap with the passive dyeing time.
Total textile and leather production time: 952 labor hours, 30 days passive production.
Raw materials
We are estimating 10 km of thread of each fiber type for our complete outfit, but we must make a further calculation to determine how much raw material went into producing that thread. Threads can be spun at different thicknesses, so to get a sense of how much raw material went into our threads we need to convert length into weight. This conversion is expressed in a unit called tex, which gives the weight in grams of 1,000 m of a thread or yarn. Thinner threads are suitable for finer fabrics, while thicker threads can produce bulkier, rougher textiles. We consulted historical reconstructions to assign texes to our different threads.
Linen – For the linen undergarment, we want a fine fabric that feels good against the skin. For this purpose, we use a tex of 55, which means the 10 km of thread weighs 550 g. To get 550 g of spun linen thread we have to start with a much larger amount of flax, since flax processing removes as much as 90% of the material gathered from the field. Our 550 g of linen thread would require around 5.5 kg of flax.
Modern experiments with historical farming methods have yielded flax harvests of about 1 kg per square meter of field, so 5.5 kg of flax would need only about 5.5 square meters of field to grow in, which would take less than an hour both to plant and to harvest. Flax processing takes several steps, but for a modest amount of flax like this, the total active work time is not great. We can estimate 15 labor hours for flax processing from planting until the fiber is ready to spin. Along the way there is also about 100 days growing time for the plants, and some weeks passive time for retting.
Silk – For the silk tunic, we chose to use a coarser and heavier fabric with a tex of 180, which amounts to 1.8 kg in 10 km of thread. This amount of silk fiber represents the output of around 5,400 silkworms consuming the leaves of some 540 mulberry trees, which would need roughly 2 hectares of land to grow on. If starting silk cultivation from scratch, these trees would need a year to grow to maturity from the planting of cuttings, but we will assume that our silk comes from an established grove, and not count the planting, tree tending, or growing time into our estimates.
What we do need to account for, however, is the growth cycle and tending of the silkworms. Silkworms take 28 days from hatching until they are ready to spin, and require care as they grow. For our purposes, we estimate that caring for the silkworms takes at least eight hours of labor every day, between preparing food, feeding, and management. Once the cocoons are spun, a skilled hand can unreel their fiber quickly. Altogether, we estimate that the production of silk fiber takes 225 labor hours and 28 days of passive production.
Wool – Our wool cloak is a sturdy outer garment meant for warmth and protection against the elements. For this purpose we choose a tex of 500, which makes for 5 kg of wool thread. Historic breeds of sheep yield between 1 and 1.5 kg of wool per shearing, and some of that weight is lost in processing. We estimate that one sheep could yield 0.5 kg of wool fiber fit for spinning, so the 5 kg of fiber needed for our cloak represents one year’s fleece from 10 sheep.
A flock of 10 sheep would need some 10 hectares of grazing land. Sheep are sturdy animals and fairly self-reliant, but they do need tending to keep them safe from hazards and fed during the winter. We are being optimistic (perhaps even unrealistically so) and estimating 100 labor hours for sheep tending in a year. Once the fleece has grown, shearing is quick for a practiced hand. Based on various numbers given by modern shearers using hand shears, we estimate that a skilled shearer would be able to shear our 10 sheep in two hours. For the needs of wool production, then, we count 102 labor hours, a year of passive production, and 10 hectares of land.
Leather – The leather for our shoes could come from one of the sheep in the flock. Since the labor for tending the sheep is already accounted for, and slaughter and skinning are quick processes for an experienced hand, we add only 1 more labor hour to account for the production of the hide for tanning.
Total raw material production time and land needs: 343 labor hours, 1 year passive production, 12 hectares of agricultural and grazing land.
Final calculations
As we have noted many times, a lot of our figures are rough estimates at best. The actual production time for an outfit like ours would depend on numerous real-world factors that are beyond the scope of our project to account for. We are also largely discounting the effects of loss, wastage, and natural or human disaster—a flooded flax field or a neighboring people’s raid on the sheep pastures would throw all our calculations into disarray. Nevertheless, here is a rudimentary good-faith estimate of the time and land investment involved in making a single set of clothes in pre-modern conditions:
Active working time: 1,316 labor hours
Passive time: 1 year
Land requirements: 12 hectares
1,316 labor hours represents over 164 full 8-hours days of work for one person. Some of the work could be shared among several people, but there is a limit to how much efficiency could be gained by division of labor—you can’t make sheep grow fleece faster by adding more shepherds, for instance.
Once raw fibers have been produced, it would take some 973 labor hours to turn those fibers into finished clothes, or nearly 122 full 8-hour days. Even with a worker dedicated full-time to each material type (wool, linen, silk, leather), it would still take more than a month to finish the whole ensemble.
For one outfit, for one person to wear.
Furthermore, every labor hour devoted to clothing production was an hour of labor not available to produce food, construct or maintain buildings, care for children or elders, or engage in other activities that were necessary for the safety and well-being of a community. Clothing was not just something to wear for historical people; it was a statement about the prosperity of their own families and the communities they lived within.
Köhler, Carl. A History of Costume. New York: Dover, 1963.
Mallory, J. P. & Victor H. Mair. The Tarim Mummies: Ancient China and the Mystery of the Earliest Peoples from the West. London: Thames & Hudson, 2000.
Images: Medieval man via Jo Justino at Pixabay. Sample T-tunics by Eppu Jensen. Hand-stitching leather shoes, photograph by Jeff Mandel via ExIT Shoes (CC BY 4.0). Spinning and dyeing in Chinchero, Peru, by Shawn Harquail via Flickr (CC BY-NC 2.0). July, from the Grimani Breviary via Wikimedia (Biblioteca Nazionale Marciana; 1490-1510; illumination on parchment). Small Herculaneum Woman, reconstruction of a marble statue, by Billy Wilson via Flickr (CC BY-NC 2.0).
How It Happens looks at the inner workings of various creative efforts.
Clothing ranges from the very simplest (e.g. ponchos, saris) to very complex designs, including multi-piece, draped, shaped, pieced, pleated, ruched, lined—or a combination of them all.
There are whole books written on the construction and history of clothes. This post covers just the very basics with some examples, keeping our inspiration outfits in mind.
Origins of Sewn Clothing
It’s surmised that the first sewn clothes—made from leather or fur—were constructed with a two-step method: first the pieces were pierced with an awl near their edges, then the sewing material (likely sinew, catgut, or the like) was pushed through the holes by hand to connect the pieces.
Needles made it possible to string thread through the eye and pull the needle and thread through holes made with an awl as a unit, greatly speeding up the process. They were first made from bone, antler, ivory, or wood, later from various metals.
Copper, silver, and bronze needles have been found, for example from ancient Egypt and Bronze and Iron Age Europe. Thicker, larger, and blunter needles were also used to make knotted nets, especially fishing nets. On the other hand, in medieval York, for instance, fine and blunt needles were used on delicate silk fabrics, where parting the filaments was more desirable than splitting them with a sharp tip. Modern and medieval leather needles have a triangular point designed to pierce leather better.
The earliest extant example of complex woven clothing—a cut and fitted garment as opposed to a wrapped one—is the 4th millennium BCE Tarkhan Dress from Upper Egypt.
Whether a sewn garment is made of leather or man-made material (woven, twined, or knitted fabric, faux leather, vinyl, etc.), certain basic similarities are found across a wide variety of garments, be they a hat or hose.
What is considered the front of the material is called the right side; wrong side is the opposite, often less showy or colorful. Some fabrics look exactly the same from both sides; either can be chosen as the right side. These days garment pieces are typically sewn right sides together, i.e., wrong side out, then turned right side out to get a neat finished item. There are some indications that this isn’t true in all cases, though by and large the concept seems valid for earlier periods as well.
Seams that serve a function—joining two or more pieces—are called construction seams. Sometimes garments can have faux seams (decorative seams) inserted purely for symmetry or looks, like some of the medieval textiles found at Herjolfsnes in Greenland.
When making construction seams, narrow bands of material (seam allowances) must be left at the cut fabric edges (raw edges) in order for the join not to unravel immediately. The width of seam allowances depends on the thickness and the propensity of the material to unravel. In modern sewing instructions, seam allowances tend to range between 6-25 mm, with 1 cm / approximately 0,5 inches being very common.
Wider seam allowances are used on thicker fabrics for pragmatic reasons (easier folding) and materials that fray easily like silk, loosely-woven fabrics, or hand-woven fabrics that need it (less inadvertent unraveling).
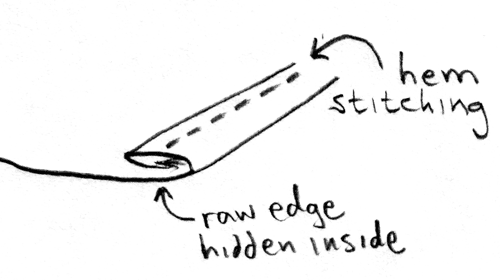
Another type of an allowance is required for treating various outer edges: hat rims or hood face openings; necklines; center-front openings in jackets, coats, or cloaks; edges of side or central slits; armholes (armscyes) in sleeveless garments; sleeve ends (hems or cuffs); bottom hems of trouser legs, skirts, dresses, shirts, tunics, and cloak or jacket-type garments; waists of skirts and trousers. A casing is a tube (which is essentially what a hem is) that is meant to contain a drawstring (or elastic in modern sewing), and can have a hole for operating the cord. These kinds of allowances tend to range from mere millimeters to several centimeters.
The reconstruction of the so-called Viborg Shirt ended up using seam allowances of 25 mm due to the linen’s excessive fraying. Slimmer seam allowances, even down to 3 mm, have been documented as well. They are mostly used in curved areas and with delicate materials. Allowances typically remain inside the finished garment.
Basic hem allowances consist of enough fabric to turn the edge in either once or twice. After turning, the edge or fold is sewn down. The double turn (double-fold) hem stays neater through multiple washes than a single turn one.
Often whether a hem is single or double folded depends on the weight of the fabric: light to medium weight (linen, lightweight wool, heavy silk) can be double-folded, and the heaviest wool gets a single fold. For example, a linen shirt’s neckline might be hemmed by turning the edge in twice and tacking it in place. A cord could be inserted inside the hem prior to stitching the neckline to reinforce it, like in some Iron Age finds from Carelia in modern day Finland and Russia. When hemming or neatening edges, the stitching can run alongside the fold or perpendicularly to it (think buttonholes, for example).
Hems are often finished in some way even when not strictly speaking necessary. Leather, fur, and felted or fulled wool don’t unravel; therefore, their cut edges don’t necessarily need to be finished or hemmed in any way. However, wearers may want them hemmed for durability or neatened with a decorative treatment.
Of course it’s also possible to leave any raw edges unhemmed—indeed, these days a distressed, unfinished edge can be a stylistic or a fashion choice—but the longevity of the garment typically suffers.
Types of Stitches
Not just clothing designs but also the technicalities of sewing (stitches, seams, seam allowances, hems, finishing, embellishments, etc.) can be specific to a culture, era, or current fashion, or vary according to material, especially the closer we come to modern era.
However, it’s often a matter of serendipity which parts of prehistoric or historical clothes from the earliest periods survive. There might not be any clear evidence of techniques characteristic of a particular site or culture at a particular time, and finds from neighboring areas (or nearby eras) need to be considered as suggestions. Furthermore, surviving pieces are often small or very small, especially the earlier the find, so enough details of a seam or hem structure might not survive to form a full picture.
A 9th or 10th century wool textile fragment with a running stitch seam from Lagore, County Meath, Ireland, at the National Museum of Ireland – Archaeology, photograph by Eppu Jensen
Common stitches during the Bronze and Iron Ages include the super-simple running stitch (straight stitch) and its stronger cousin the back stitch. Overcast stitch (whip stitch) was used for tacking down seam allowances and hems, sometimes also for construction seams. Buttonhole stitches (blanket stitches) could also be used for various hems or edges, or to reinforce points where seams come together. Furs in Scandinavia were sewn largely with overcast stitches in the body of a long seam and running stitches in high-stress areas where the seam shouldn’t stretch or give. The woollen Orkney hood (radiocarbon dated to c. 250-615) was patched with chain stitches.
Eight different types of stitches from the salt mines in Bronze and Iron Age Hallstatt, Austria, illustration from Karina Grömer et al., The Art of Prehistoric Textile Making: The Development of Craft Traditions and Clothing in Central Europe (Vienna: Natural History Museum Vienna, 2016) p. 220, fig. 129
In European Bronze and Iron Ages, it was typical to sew wool with linen or wool thread, and it was pragmatic to use the same wool that the fabric was woven with, provided it’s not too loosely spun, too thick, or too rough for the purpose. (Long, uniform, and fine fibers make the best thread, because protruding fiber ends in coarser quality wool make sewing much more difficult.) Similarly, linen was sewn with linen, and silk with linen or silk thread. Linen for sewing might be treated with beeswax to smooth and slicken it.
Types of Seams
Sewing two pieces of material together simply (plain seam) will do if the goal is to get something wearable in a hurry. However, finishing off (neatening) the raw edges of seam allowances or in some way tacking down the seam allowances in their raw state lengthens the life of the garment.
A flat-felled seam (felled seam, run-and-fell seam) completely encases the raw edges of seam allowances. It can be executed with a running stitch for the seam proper plus overcast stitch (possibly also running stitch) to attach the folded edge of the seam allowance. They were used e.g. in Anglo-Scandinavian period England, and Bronze and Iron Age Scandinavia and Germany. Another, very similar seam doesn’t fold in the raw edges, merely presses them to one side and tacks them down.
In a spread seam, the seam allowances are pressed flat on both sides of the seam and their edges are sewn down with either overcast or running stitches.
A handsewn spread seam from Herjolfsnes with overcast raw edges, diagram from Else Østergård, Woven Into the Earth: Textiles from Norse Greenland (Aarhus: Aarhus University Press, 2004) p. 99, fig. 66
Both seam types make a durable join. They also typically show on the right side of the fabric more clearly than a plain seam does (which could be turned into an advantage by using contrasting color thread). Small braids or cords could be used to cover the raw edges at hems or seam allowances, like in some Viking contexts in northern Germany and Ireland.
The wrong side of 11th-century Skjoldehamn-type hood whose seam allowances are finished with yarn, photograph by Madeleine via Maddies Hantverk
Typical Designs
Surviving textile fragments often range from very small to small, so even if we have details of a seam or hem structure, they might not reveal anything about the overall shape or dimensions of a garment.
For a lot of (pre)history, a simple T-style cut seems to have reigned in tunic and dress design, like ancient Roman tunicas, the wool tunic find from the Lendbreen glacier in Norway (dating from 230 to 390), or our example tunic from Egypt with dionysian ornament (from the 5th century). Exceptions clearly do occur, though. For instance, the Tarkhan dress shows distinct signs of pleating on the sleeves and top of the bodice. Also, from Hallstatt there are a number of finds that are shaped (tailored) to the body. A labor-saving technique is to cut the front and back pieces as one, poncho-style.
Ease (for movement) is required from any article of clothing that’s either narrow or tailored. One of the simplest ways to create ease is to use slits, for example at trouser ankles, or cuffs and side seams in shirts and dresses, like in the wool tunic (probably from between 70 and 320) found in the Thorsberg bog in northern Germany. Central seams or central lines at the front and back of a garment are another pragmatic place for slits.
Necklines can also include a slit. For instance, a keyhole-shaped neck opening—essentially a circle with a slit below—is common in historical tunics and shirts. Other common neckline shapes include V-neck, O-neck (crew neck, round neck), and a shallow elongated one that we would now call a boat neckline.
For comfort, many historical tunics insert into the underarms small squares of fabric that fold into triangles (gussets, gores) creating a little extra room.
Underarm gusset for a Regency shift or chemise, photographs by Amanda via 30th Bash Blog, collage by Eppu Jensen
Large triangular gussets or gores can also be inserted at side seams, sometimes also at the center front and back. An alternative way to avoid sewing underarm gores is to cut wider sleeves that taper towards the wrist, like the 11th-century Skjoldehamn tunic from northern Norway.
Pants or trousers are essentially two tubes running from the waist to the hem joined together by the crotch. Ease in pants is gained by fitting the shape to the wearer carefully, especially at the joints (crotch, knee, and ankle). An alternative is cutting a large enough circumference that ease is not needed, in which case the waist (if not the hems as well) needs to be gathered and either belted or cinched with a casing and cord.
A pair of woven pants belonging to a rider found from Yanghai, Turfan, China, and dated to c. 1200-1000 BCE, photograph via Helsingin Sanomat
Cloaks or mantles were typically either rectangular, circular, or semicircular. The former two types were apparently known already in ancient Egypt, while the so-called blue Kunigunde mantle (early 11th century Germany) is a gorgeous embroidered example of the latter. A well-attested outer garment in ancient Greece and Rome was the paenula, a poncho-like bell-shaped cape, that was worn for centuries.
As with other design features, clothing lengths vary from era to era, culture to culture, class to class, group to group, function to function. There are many cases where the basic shapes are the same and the decorative features, including color, separate types of wearers from each other. Male garments tend to be shorter than female ones, but not uniformly.
In cutting garment pieces from fabric, economy reigned and wastage was minimized. We have extant clothing remnants where selvage edges and raw edges have been combined side by side, so clearly a desire to use as much of the fabric as possible existed. (Modern sewing instructions advise cutting out selvages altogether.) Garment parts that remain invisible underneath the overlayers could be less fine and might have been made from rougher materials or reused from older clothes.
Sewing Speed
All sewing was done by hand until the sewing machine was invented around the middle of the 19th century. While not as labor-intensive as spinning and weaving, handsewing was still a significant investment of time, especially the more decorative types. It’s no wonder that clothes were often mended and reused until they were falling apart, and at the end of their lives put to use as modest utility textiles or rags.
It’s nearly impossible to find comprehensive information on how long sewing a garment took before there was an interest in collecting and publishing statistics (in the 1800s or so). Research and experimenting give the best insights we have.
In one experiment, during the reconstruction of the fur outfits (kaftan and cape) belonging to the 900s male and female burials from Bjerringhøj and Hvilehøj, Denmark, sewing a 10 cm seam with two different types of needles was compared. A modern steel needle was significantly faster at approx. 7 minutes, while a replica bronze one took 12 minutes. One meter of seam would, with these speeds, require between 1 hour 10 minutes and 2 hours.
In another experiment, the reconstruction of the 11th century Viborg Shirt in linen took just under 17 hours to sew. However, there are some complex features in its design: the body (shoulder to waist area) is lined both front and back, the square neckline is fairly involved, and there are several seams attaching the outer fabric and the lining together (quilting), so it would’ve taken much longer than a comparably-sized plain T-tunic to sew.
A modern re-enactor handsewing a Viking Age replica woman’s underdress estimated her speed to be about 1 meter per hour for a total of about 25 hours, entirely by hand. Another cited a Tudor era doublet for a 5-year-old boy, half sewn by hand and half by machine, having taken approx. 36 hours of work. The latter did require careful fitting and was lined, so an unlined, much simpler project should cut that time in half if not more.
A very rough estimate for sewing fabric tunics might therefore be 6-9 hours, and naturally more for dresses or anything else with long or complicated seams. Leather is a little slower to handle, but it might be possible to save time by skipping the hemming step, depending on the garment and its purpose. As always, rough-and-ready uses require much less effort and time investment than high-status items.
How It Happens looks at the inner workings of various creative efforts.
Leather is produced from a wide variety of different animal skins, from both wild and domesticated creatures.
Origins of Leather Production
It’s unclear when humans started wearing clothes—and what, precisely, can be identified as clothes in archaeological finds—but the first garments were likely some forms of hide or leather wrappings. Tools for scraping hides date back at least to 120,000 BCE, probably already some hundreds of thousands of years earlier, while studies based on body lice suggest clothing might have been adopted around 170,000 BCE.
The oldest archaeological remnants to do with sewn apparel are bone awls and needles, the oldest of which date back to roughly 80,000 BCE. Using them as evidence, it has been estimated that the earliest clothes made from animal skins were produced approximately 70,000-30,000 years ago, but the question is still open.
However, a recently published study of small sandal-like prints, found in sandstone at three places along South Africa’s Cape coast, discussed not just the sandal prints, but also indications of strap attachment points within the prints. None of the three sites have been dated yet, although nearby sites suggest that they may be from around 70,000 to 130,000 BCE. If confirmed, that’s a staggeringly long time for humans to have been constructing multi-part coverings for themselves.
The oldest extant shoe we do know of (the so-called Areni-1 shoe) was found in Armenia and dates back to the local Copper Age, 3600-3500 BCE. It was made of leather and various grasses. The footwear Ötzi wore, from 3300 BCE or so, involves similar materials: a leather covering over sock-like inners made of lime or linden bast. He also wore two coats, a belt, leggings, a loincloth, and a cap, all carefully sewn from leather or skins of various kinds.
Bog deposits can preserve details that don’t survive in regular burials. For example, the 2nd century BCE Huldremose woman from Denmark had a cape made from several dark brown sheep skins. This outer cape had a collar of light-colored sheep skin, and the wool side was turned out. Underneath she wore another cape, made from 11 small dark lamb skins with the wool side in.
Types of Leather
Domesticated mammals like cattle, sheep, goat, and pig yield most modern leather, although leather can also come from wild animals such as deer, squirrel, and rabbit, as well as non-mammals like ostriches, lizards, and fish.
There is quite a variety of vocabulary connected with leather, starting with the types of raw material. Pelts are typically undressed and still contain the hair, fur, or wool. The word hide is used of pelts from larger animals (cattle, moose, etc.), while those from smaller animals (rabbits, pigs) are sometimes referred to as skins. Fur, when speaking of materials, refers to a processed hide with the hair retained. Treated hides or skins without fur or hair are leather proper, but you do also see the word leather as a generic term for any kind of animal skin product.
These days, tanneries buy quality-graded raw hides. Issues like holes, deep cuts, scars, large abrasions, discolorations, skinning machine damage, remaining hair, and grain inconsistencies affect the grading. Grades are numbered from one to three (best to weakest quality), in addition to which there is hide considered untannable.
The quality and characteristics of leather vary based on where in the hide it comes from. The shoulders generally have a firm yet malleable and flexible feel. The rump areas are the thickest and firmest in a hide and make good sturdier items such as heavy belts. The areas ranging from the spine towards the belly are some of the best leather available in a hide, while belly leather is a little softer and stretchier than others.
Like human skin, animal skin is composed of layers. In modern production, leather is usually split to gain materials with different qualities, most commonly into outermost layers (yielding e.g. full grain, top grain, corrected, or nubuck leather) and lower layers (e.g. split leather, suede). Both kinds can be treated further.
The treatment can also give a leather its name. For instance, while both have a nap-like soft finish, nubuck is considered top grain and suede a split. Chamois is a soft pliant leather produced from the skin of the chamois (a species of mountain goat) or from sheepskin. Patent leather has a high-gloss coating and was developed in the 1700s.
Collecting Materials
The only way to get leather is to skin something. Skinning is recommended as soon as possible after death (because otherwise the hide will start decomposing in a matter of hours and because it makes the following steps easier). Smaller animals (e.g. squirrels, minks) can also be skinned as a tube.
The amount of leather that comes from one animal naturally depends on the size of the animal and the condition of its hide. In modern leather processing, a typical cow hide yields 4.6 square meters of finished leather, while a sheep hide yields 0.8 square meters. Hides in poor condition may have to be trimmed to be usable.
Craftsmen cure and prepare to cut leather used in the manufacturing of Fulany conical sun hats in Bamako, Mali, photograph by Emilio Labrador via Flickr (CC BY 2.0)
Skinning is relatively quick, but it is only the first step in leather production. The preparation, preservation, and treating the hide takes many more steps that may amount to months of labor before the leather is ready to be cut, fitted, and finished.
Processing Leather into Useable Forms
The core of leather processing is called tanning. Tanned material is flexible and doesn’t rot. During tanning, the protein structure of a pelt is chemically altered to protect it against moisture and microorganisms. It basically means the replacement of natural fluids and fats with preservative agents (minerals, tannic acids, and fats or oils).
There’s an enormous variety of traditional tanning methods, so the description below is bound to be cursory.
Prior to tanning, the fresh raw skin (green hide) needs to be prepared. It involves fleshing (removal of meat and fat by scraping or pounding) plus dehairing if desired (soaking in water, urine, or an alkaline solution), then the hide is stretched over a frame and dried.
Raw hides dry out hard and inflexible, and they can also putrefy if they get wet again. Green hides can be cured to prolong the time they can be effectively treated in. It often involves salting (or, in modern processing, applying other chemicals) to remove excess water. (Compare this to curing meat with salt to preserve it.)
There are many other options for pretreatment, for example liming and deliming (a chemical process to remove epidermis, hair roots, undesired fats, and soluble protein), bleaching, and pickling and depickling (altering the pH value).
So-called vegetable tanned leather is treated with tannins from plants. Tree bark or leaves are an old, convenient source for tannic acids. Tannin baths derived from different barks produce different coloring on the leather (e.g. birch yields a yellowish and spruce a darker brown).
Impregnating leather with various fatty or oily solutions (fatting, fat curing, fat liquoring) for preservation and waterproofing is an age-old option. It has the benefit of softening the leather as well.
Smoking or smoke tanning is another possible processing method. Formaldehyde from the smoke offers some microbial and water resistance. For instance, fat cured and smoked chamois leather (made by oil tanning where fish oil or other fatty substances are pounded in until they have replaced the original moisture) can be washed and wrung almost entirely dry.
If desired, some finishing processes like buffing, waxing, or embossing can be applied. Dyeing leather is possible during or after tanning. Some methods or colors are more difficult to achieve, others easier. For example, vegetable tanned leather can be dyed black even at home simply with vinegar and rust. Henna-dyed leathers apparently tolerate rubbing quite well, while their lightfastness is only moderate.
As the processing times of various methods vary so widely, it’s extremely difficult to estimate the time devoted to tanning in the past. Early periods presumably largely favored simpler approaches, like a mostly mechanical treatment (working the animal’s own natural fats or brains into the skin) plus smoking. It’s probably fair to estimate from a few days to a week even for this method of tanning.
Alternatively, tanning leather thoroughly in a tannin bath can take months. Due to the extensive time commitment, in later Iron Age Finland vegetable tanning was likely used for a handful of days only (essentially to dye the leather), and the tanning process was finished with a fat treatment.
Typical Uses of Leather in Clothing
Leather garments are durable, nearly waterproof, and pragmatic for many demanding tasks. Footwear is an obvious choice due to the durability of leather: boots, shoes, moccasins, and slippers, sometimes lined with felt or with fur inside, are still being made. (Armor is another, but that’s beyond our focus here.)
Different furs and leathers are suited to and have historically been used for different purposes. Moreover, even though leather, hide, and fur might have been sourced from the same animal, the uses that those materials have been put to often differ both in prehistory and historical eras. Leather was and still is used for clothing meant to endure harder wear, while fur is reserved for warmth and a show of luxury.
As an example, from around 1800 BCE onwards, the residents at the various sites around the Tarim basin in Xinjiang, northwestern China, wore a variety of leather garments: footwear (some of them dyed), skirts with the fur turned inside, sheepskin trousers, leather coats (e.g. of sheepskin), and mittens (or possibly a falconer’s glove or the like). An interesting coat variant from the Qizilchoqa cemetery, approx. 800-530 BCE, had the fur turned inside with integrated gloves (i.e., sleeves continuing as mittens).
In the Nordic countries during the Iron Age, sturdy goat leather was often used for footwear, or if fur was desired, seal, deer, moose, or cow hides were selected, especially from around the legs. Thicker cow or calf leather was picked for belts and shoe soles. Soft, thin chamois was made from deer or goat, and thicker types from moose. Fur clothes were made from summer deer, fall reindeer, or sheep pelts, all of which might also be dehaired and used as leather for shirts, pants, or hoods.
Fat-treated leather garments tolerate wet conditions well. For Nordic Iron Age sailing crews, the layers closest to skin were probably wool, since it stays warm even when wet, but the outer layers may have been made from vegetable tanned goat or sheep leather and fatted leather. By processing a hide with a mixture of tallow and tar it’s possible to get it nearly waterproof.
Xiongnu Leather Robe, Han period (roughly 200 BCE to 220 CE), photograph by Gary Todd via Flickr (CC0 1.0 Universal), edited by Eppu Jensen
During historical periods leather was also used for gaiters, headwear, and fur leggings, for example. Other garments commonly made from leather include cloaks or capes, while fur has long been used as lining or trimming for woven cloaks or coats. For instance, the high-status 900s CE man from Bjerringhøj, Denmark, wore a cloak of beaver skin decorated with tablet-woven bands of wool, and a woman from Hvilehøj, Denmark (also from 900s CE), had a fur cape as well. Hers was made of forest marten edged with beaver skin and various bands of wool and silk. She also wore shoes of fine goatskin with hair on the outside.
A traditional Sami beaska (in Finnish peski, a kind of an anorak) requires about 5-7 reindeer skins to make. In the coldest season, the Sami sometimes wore two beaskas, the one closest to the body with fur facing in and the outer one with fur facing out.
A Sami woman’s wedding beaska from Enontekiö, Finland, c. 1915-1916, made from reindeer fur and wool, photograph by Saamelaismuseo Siida via Finna (CC BY-NC-ND 4.0)
Also utility products out of leather have long been common. For millenia, leathers, hides, or furs were used to wrap bodies in for burial or placed underneath a body in a grave. Other examples include tents and other shelters, cushions, drum skins, saddles and reins, scabbards, sheaths, fur or leather belts and belt pouches, and bags of various kinds. There are finds from Iron Age Finland where fur was used even to line knife sheaths.
A Viking leather pouch and belt made worn by historical reenactor, photograph by Can Pac Swire via Flickr (CC BY-NC 2.0)
These days, lamb and deerskin are chosen for soft leather in more expensive uses, and deerskin for work gloves and indoor shoes. It should be noted that fluctuations in heat and humidity can ruin a leather garment. They should not be exposed to high heat, and it’s recommended to spread them out to dry for best longevity.
How It Happens looks at the inner workings of various creative efforts.
Plant fibers come basically from one of three parts: stem, leaves, or seeds. Bast fibers are harvested from the stems of various plants or trees and include flax (linen), hemp, jute, and ramie (a nettle family plant). Among leaf-derived fibers, sisal is perhaps the most commonly known. Seed fibers include cotton, coir (coconut shell fiber), and kapok, for example.
Plant fibers have been used for textile production for tens of thousands of years, at latest since the Neolithic. Many of the coarser plant fibers were (and still are) used for utility items like ropes and cords, nets, sails, bags, sacks, packs, and various wrappings. The softer ones were, naturally, a desireable material for wearable textiles.
This post will concentrate on linen and cotton, and treats their history and processing separately. However, dyeing and typical uses of of linen and cotton will be discussed together.
LINEN
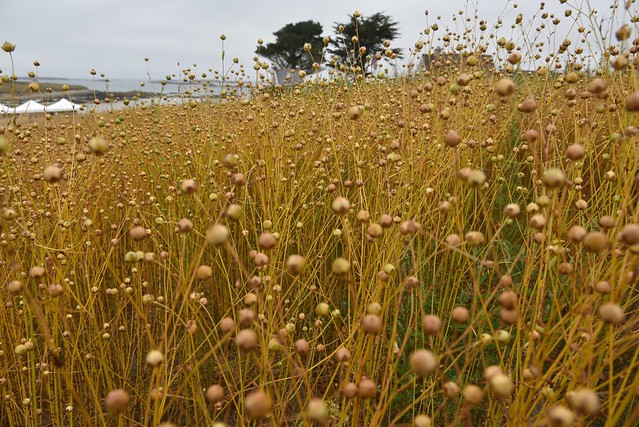
Linen is produced from the fibers of the common flax (Linum usitatissimum). Flax provides both oil (known as linseed), edible seeds, and fibers. As a bast fiber, the length of the raw fiber is determined by the height of the flax plant when harvested.
(As a sidenote, nettle is a bast fiber similar to linen. In archaeological finds, it can be very difficult to differentiate between flax and nettle by eye or even by microscope. It does seem, though, that nettle has been used in northern, central and eastern Europe, e.g. among Finnic tribes, at least from 2500 BCE onwards. For example, the Oseberg ship burial apparently included some nettle fragments. The processing of nettle follows in broad strokes that of linen, except nettle doesn’t necessarily need to be retted. However, the loss of plant material during processing is greater, i.e., even less spinnable fiber is gained than from flax.)
Origins of Linen Production
The world’s earliest extant linen remnants are tens of millenia old. The Upper Paleolithic Dzudzuana Cave in the foothills of the Caucasus Mountains in Georgia was inhabited intermittently during several periods dated to approximately 32,000-26,000 / 23,000-19,000 / 13,000-11,000 BCE, and has preserved dyed and knotted flax fibers (either twisted or spun) used for hafting stone tools, weaving baskets, or sewing garments.
Over time, first in the Fertile Crescent region, humans domesticated flax, focusing on taller plants with fewer branches and pods but longer stems that yielded more fiber. Cultivation seems to have started in the Near East around 8000-7000 BCE. In Turkey and Palestine, the use of flax dates back to at least the 7th millennium BCE.
The oldest known piece of linen cloth, dated to c. 7000 BCE, was found at Çayönü in southeastern Turkey. From Nahal Hemar Cave near the Dead Sea in Israel’s Judean Desert were found scraps of linen yarn and fabric, produced with twining, knotting, and looping techniques, including the remains of what appears to be some type of headgear, dated to 6500 BCE or thereabouts.
There is evidence for linen production in Egypt approx. 5500 BCE and for flax cultivation 4000 BCE or so, and for the latter on an industrial scale from around 2000 BCE onwards.
Linen goods from the tomb of Ramose and Hotnofer, Dynasty 18, reign of Hatshepsut, c. 1479-1458 BCE, photograph by wilddaughter via Flickr (CC BY-NC 2.0)
Also in Europe, flax cultivation at least from 4th millennium BCE is plausible. For example, numerous artefacts to do with textile production plus finished products like fabrics and netting dating between 3900 and 800 BCE have survived in late Neolithic and Bronze Age sites in eastern Switzerland and Germany. In southern Spain, near Córdoba, a 4th to 3rd millennium BCE burial deposit (five spliced-yarn flax fragments) in a small cave at Peñacalera in the Sierra Morena hills preserved the oldest examples of loom-woven textiles in the Iberian Peninsula. In Italy, linen textile fragments found at Lucone di Polpennazze have been dated to Early Bronze Age (2000 BCE or so).
Five linen textile fragments recovered from the Peñacalera Cave in southern Spain, dated to the 4th to 3rd millennium BCE, by M. Gleba et al. via Scientific Reports
Types of Linen
In modern commercial linen production, fibers aren’t formally graded by international standards like for example silks are. However, as a general rule, the better the quality of a linen yarn is, i.e., the longer the fibers in the yarn, the higher quality fabric can be woven from it. Tow-based yarns are coarser and rougher.
These days, the best fibers are used for lace, fabrics (e.g. shirt or suits), and bed sheets. Coarser grades are used for twine and rope, and historically for canvas and webbing.
Collecting and Processing Linen into Useable Forms
Cultivating flax starts from gathering seeds as well as sowing and weeding the fields. Harvesting modern flax usually happens 90 to 100 days from planting. Uprooting the plants by hand (pulling) yields the longest stems (i.e., the longest possible fibers) but is slower than harvesting with a blade or a machine.
Once harvested, seeds are removed from the stalk (rippling). Next the stalks are soaked in water (retting) to dissolve lignin and pectin and loosen the fibers. Care must be taken not to over-ret the stalks and by so doing damage (rot) the fibers. Depending on the method used, retting may take from several days up to three weeks.
It’s also possible to leave linen unretted. This so-called green linen (or green flax) is stronger and stiffer than retted linen. Nowadays it’s used as the raw material for utility textiles such as sails, packing materials, and other functional products.
Retted, dried flax is ready for breaking and scutching. Breaking is done with a wooden instrument (a sawhorse-like set of hinged wooden blades called a brake), or, even more simply, something club-like to remove the outer rotted stalk. In scutching, bundles of flax stems are beaten or struck with a long wooden knife (swingle) to separate the woody parts of the stem from the fibers.
The last step before linen can be spun is heckling or hackling, a process similar to the carding of wool in which combs or brushes are used to straighten and align the fibers; heckling also removes the final remains of the stem (tow), which can itself be re-hackled and/or spun into a coarse yarn.
An alternative technique to spinning, likely the oldest form of yarn making with flax and other bast fibers, is known as splicing. There are several variations (for example, rolling fiber ends between thumb and index finger) depending on material and local traditions. In broad terms, splicing means joining strips of fibers individually (end to end) or layered together in a thin bunch, often after having been stripped from the plant stalk directly without (or with only minimal) retting. Spliced yarn is weaker at the splice point and is often reinforced by plying. There is some evidence to suggest that the change from spliced to spindle-spun yarn is linked to fiber length (i.e., an alteration in the plant), quite possibly the result of conscious selection by humans.
Linen is stronger wet than dry, so it’s easier to spin damp using a spray bottle, or regularly dipping fingers in a water bowl. Drop spinning (spindle spinning with a whorl) and supported spinning (rolling against the thigh) are both ancient options.
Modern weavers recommend higher humidity also when weaving linen. Another factor to pay attention to is tension to avoid snapping the warp, since linen is not as elastic a fiber as for example wool.
Suggested prehistorical spinning and weaving speeds can be gleaned from research and experimenting. Two academic analyses in Denmark done by expert spinners on flax averaged about 24-33 meters and 55 meters per hour, respectively. Weaving a 95 cm wide linen tabby for a reconstruction of the so-called Viborg Shirt at Ribe Viking Centre took approx. 37 hours per meter (not including setting up the loom). Although the processing of flax is more complicated than that of wool, the extra work is still a fraction of the total labor spent to produce wearable clothes; the majority of time still goes to spinning and weaving.
COTTON
The 50 or so wild cotton (Gossypium) species are found in nearly all tropical areas and can grow as tree, bush, or grass. The plant was independently domesticated on both sides of the Atlantic. Cotton is currently enormously important as a commodity and textile material.
In the Indian subcontinent, the earliest extant cotton finds have been dated to 5500-5000 BCE. Spinning probably started by around 3000 BCE at latest. India had the monopoly for cultivating cotton till approximately 2000 BCE, after which cultivating spread to the Persian Gulf and Asia, and later to Egypt, Greece, Malta, and the Roman Empire.
The Incas and Mayas also used cottons, and there recent archaeological research has identified the use of cultivated cotton (Gossypium barbadense) in the ancient Andes dating back to at least 7800 years ago. The so-called Paracas Textile is a cloak made from cotton and camelid fiber, produced by the Nasca culture around 100-300 CE, and one of the most renowned Andean textiles in the world.
Closeup of one of the corners of the Paracas Textile via Brooklyn Museum (Paracas, Peru; 100-300 CE; cloak made from cotton and camelid hair)
By 4th or 5th centuries CE, areas further from the core cotton production areas had also picked up the skill; for example, in Kara-tepe, a pre-Islamic site near the Aral Sea in northwestern Uzbekistan, cotton seeds were found in amounts too numerous for them to be casual debris. By early 600s CE in the kingdom of Khotan (in the Tarim basin in Xinjiang, northwestern China), most people had moved away from wearing wool or fur and dressed in light silks or white cotton.
It also seems that Lower Nubia in Africa (roughly modern southern Egypt to northern Sudan) had developed its own cotton industry using their native variety of Gossypium herbaceum, sometimes referred to as ancient Nubian cotton, by 400 CE or so.
Types of Cotton
Currently there are about ten cotton cultivars of commercial viability. Most of the wild varieties have too short fibers and are, therefore, completely useless for making thread. (It’s difficult if not impossible to spin plant fibers shorter than 10 mm.)
The most important modern subspecies are Gossypium hirsutum, which is native to Central America, and Gossypium barbadence from Ecuador and Peru. The original South Asian variety is called Gossypium arboreum and there is evidence of its cultivation already in the Indus Valley civilization.
As a plant fiber, cotton’s most important component is cellulose (unlike protein in animal fibers). Cotton can also contain minor amounts of waxes, fats, pectins, and water. The quality of cotton depends largely from genetics, but growing conditions, especially humidity, also have an impact.
Grading cotton involves multiple attributes (color, purity, fiber length, fineness, strength, etc.) and there are many international standards. Purity, which refers to the amount of stem, leaf, and seed remnants (trash particles) among the fiber, is another important factor. Impurities can be seen as dark spots in the fabric.
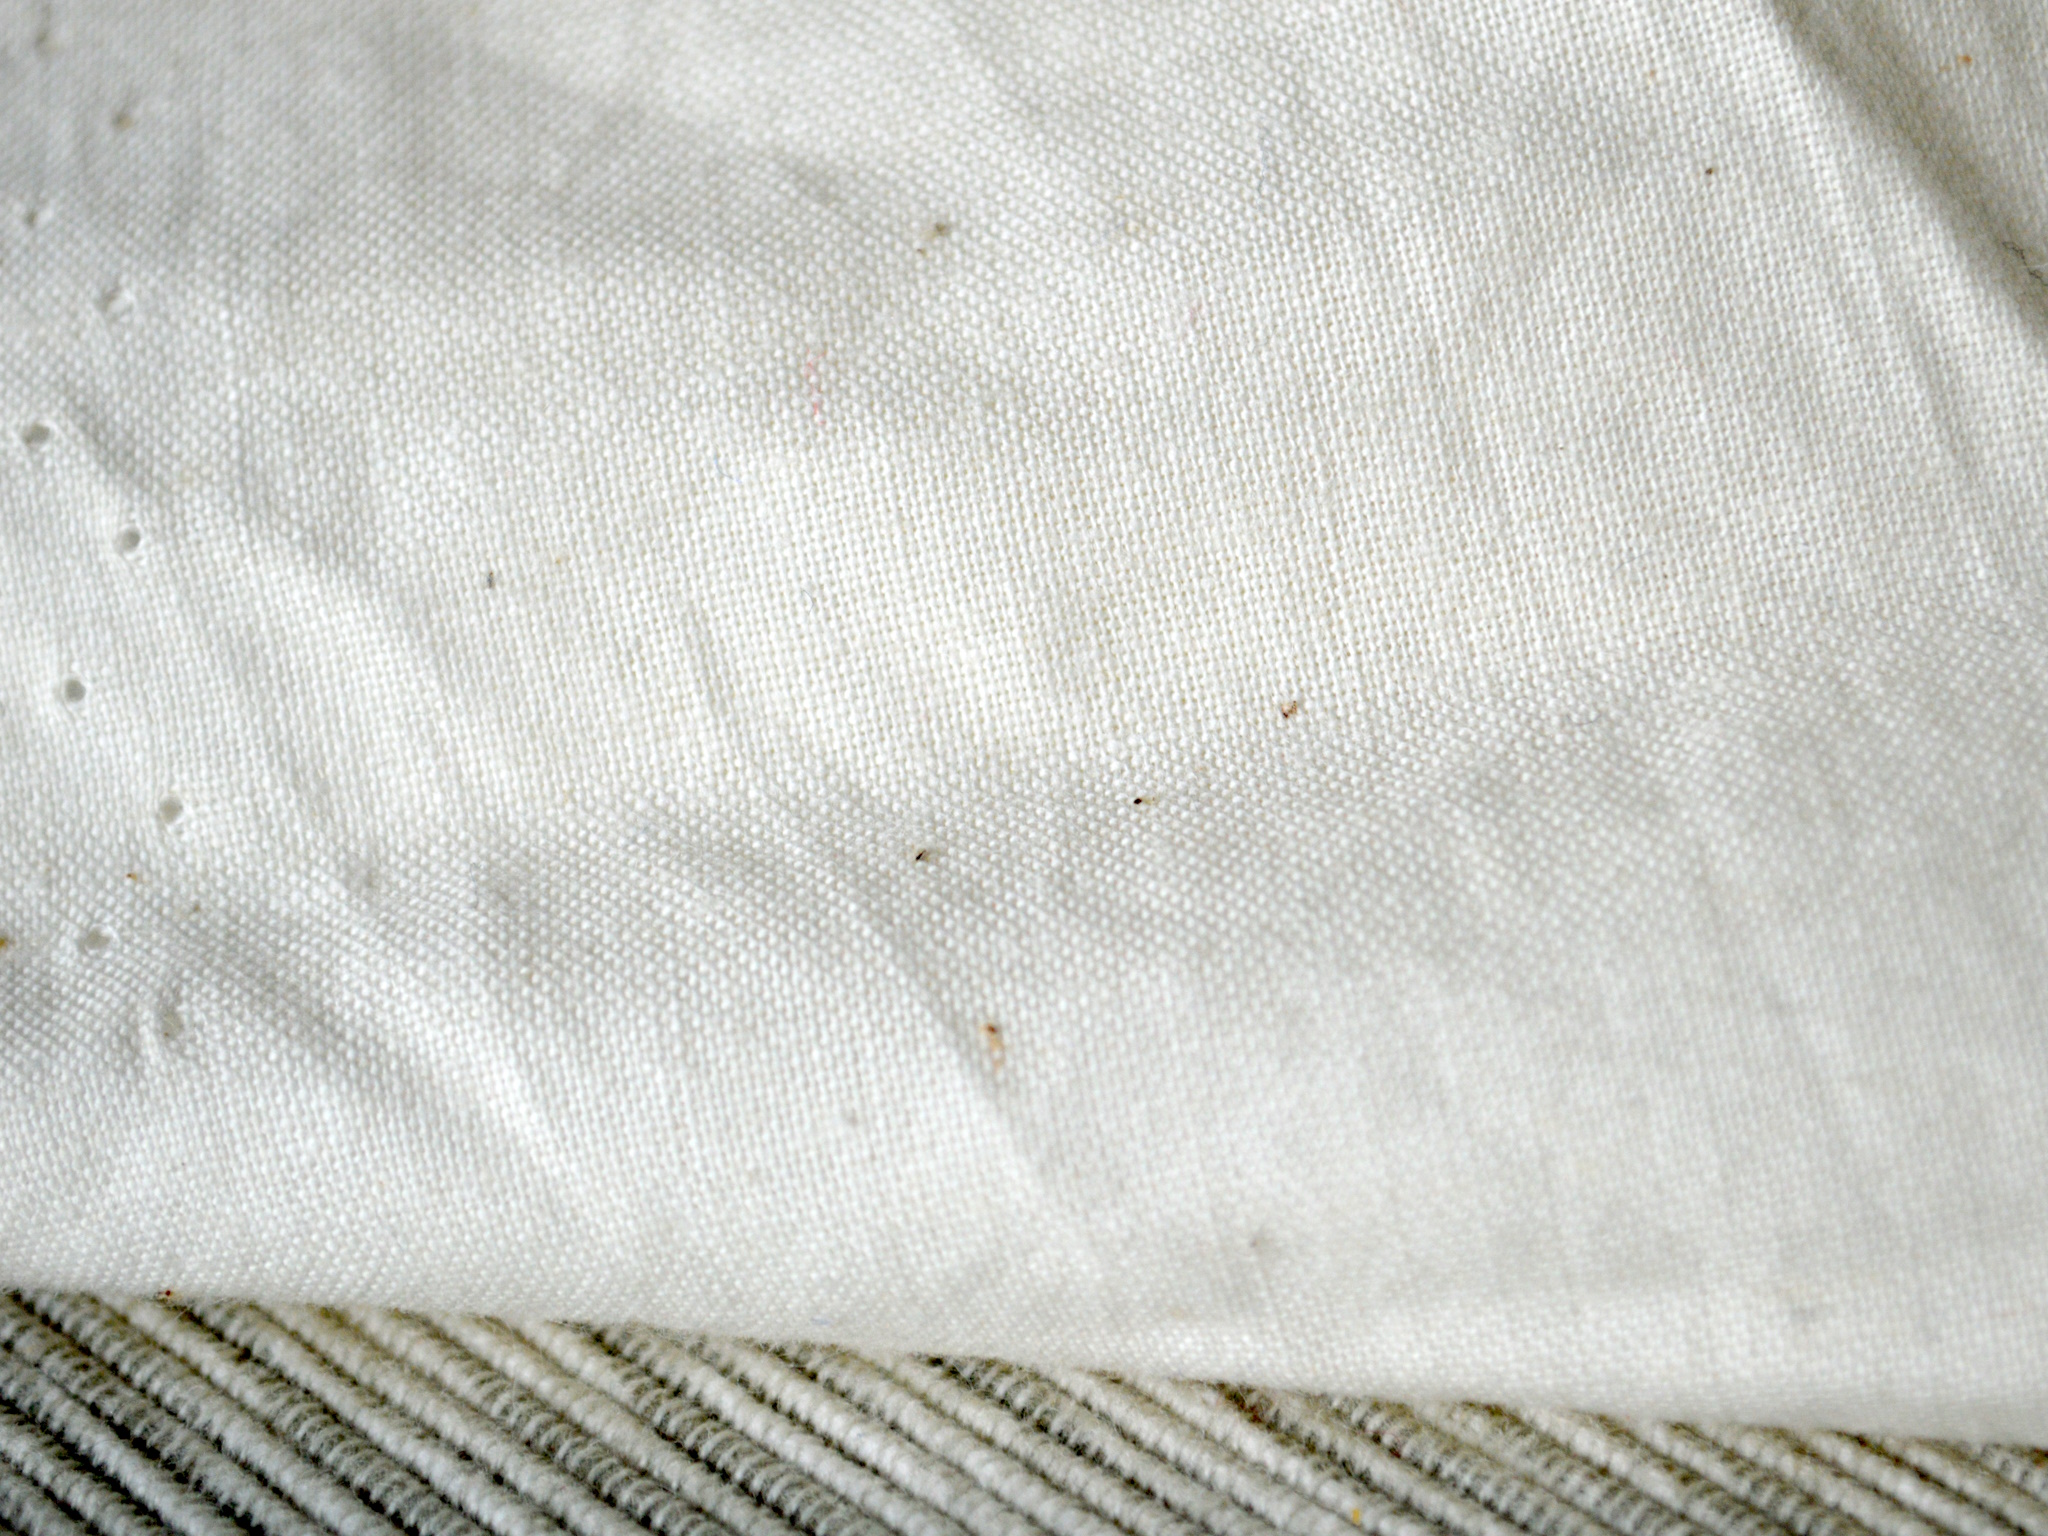
Cotton muslin with impurities, photograph by Eppu Jensen
One of the most important factors in cotton grading is fiber length. Extra long varieties are those with fiber length over 35 mm, long 30-35 mm, medium long 15-30 mm, and short 10-20 mm. The fibers’ fineness is in direct relationship to their length: the longer the fiber, the finer it is.
Collecting and Processing Cotton into Useable Forms
The cultivation of cotton takes about 120 days to develop from sowing to harvest. The difference between day and night time temperatures should be as small as possible for optimal yields, and high humidity and strong sun benefit seed growth. Cotton plants are not the easiest of crops, because they are susceptible to pests, molds, and plant and fungal diseases.
Cotton fibers (lints) grow inside a seed pod (boll) mingled with seeds. The seed pod surface is covered by shorter nap-like fibers (fuzz). These days, each seed contains approximately 10,000-20,000 fibers. Once seeds ripen, the bolls open and fibers burst out; the seed pods are then easy to pluck off. For the majority of cotton cultivation’s history, harvesting was slow because it took place by hand.
Once the seed pods have been collected, they need to be dried. Then fibers are pulled from the bolls (ginning), and contaminant plant material is separated from fibers (cleaning). Before the invention of cotton gins in the late 1700s, this was all done by hand. (From c. 400 CE onwards, first in India, the process got a little faster with the help of handheld roller gins.)
In modern processing, the residual fibers after ginning (linters) can be used to make paper and as a raw material for semi-synthetic fibers like rayon, viscose, or modal. Cleaned cotton fibers are graded and baled for transport.
Prior to spinning, cotton is carded like wool to align the fibers. The trace amounts of waxes in cotton help keep the fiber softer and more elastic, which make it easier to spin. In modern processing, the waxes are therefore removed only after spinning.
Cotton is more difficult to spin by hand than wool, since its fibers are short and don’t tend to adhere to each other as readily. Modern hand spinners recommend making a thinner yarn with more twist for a more stable end product and spinning much faster than they normally would.
DYEING PLANT FIBERS
Plant fibers withstand hot dye baths better than wool and silk, but are in general more difficult to dye. There nevertheless exists a long history of dyeing plant fibers. For example, one of the Peñacalera linen fragments mentioned above, dating to approx. 2500-2300 BCE, was exceptionally fine and dyed with cinnabar (a red mineral).
As a rule of thumb, plant fibers require mordanting beforehand, and are a good fit for tannin mordants. The degree of bond and colorfastness (fade-resistance) depend on the fibers and dyes used. Dyeing takes approximately 14 liters of water per 1 kg of linen or cotton yarns.
Undyed, unbleached linen has a yellowish to grayish brown color. Cotton tends to be white, but there are also varieties of pale yellow to brown or reddish hue. Cotton and linen require more dyestuff to achieve deep or vibrant colors, because they dry three values lighter than when wet. (For example, cotton dyed with the same directions as wool will produce a paler and more subdued color.)
TYPICAL USES OF PLANT FIBERS IN CLOTHING
When linen or cotton were first introduced to a new area, they were often reserved for high-status uses such as burial goods or Sunday best. With time and increased imports or the start of local production, the new materials became common enough even for menial purposes.
Since their strength increases when wet, both linen and cotton have long been used in contexts where that is a benefit (e.g. fishing nets and other such utility textiles). Cotton has also been applied for sewing or as a trim. In Iron Age Finland, threads made from linen, hemp, or nettle were used in sewing (e.g. of leather knife sheaths) or as warp for tablet-woven bands. In later periods, too, cotton was used as warp when weaving fabric (e.g. silk or wool) to increase durability. Historically, linen has been long used for underclothes, bed sheets, and table linen.
Under woollen outer clothes, plant fibers can be worn as the layer closest to skin for comfort, but they make poor insulation on their own. Multiple layers trapping air between them do, however, provide some benefit, as does napping the fabric (e.g. flannel), or fluffier or multi-ply yarns.
Plant fibers don’t pill or form an electrostatic charge (static) as readily as wool. They also tend to be fairly heavy and bend or wrinkle easily. (Compare them with paper, which is also made of cellulose.) Linen is stiffer, stronger, and more absorbent than cotton but even less elastic, meaning that wrinkles show very well in it. Linen has excellent heat conductivity, plus—thanks to its stiffness—is less likely to cling to skin, which are desirable qualities in humid or hot circumstances.
Linen tolerates high temperatures especially when wet (i.e., it can be ironed on high heat effectively with steam or through a damp cloth), but prolonged dry high heat will start breaking the fibers down, which happens at 260-320 C. Linen doesn’t handle mechanical stress (rubbing) very well, is susceptible to mildew and is more difficult to bleach than cotton. Linen is also shinier, almost silky, and dries fast. Linen tolerates direct sun better than cotton, and because of the smoothness of the linen fibers, it’s somewhat resistant to dirt. Linen’s poorer capacity to handle rubbing makes it a more challenging choice for utility clothing, but its higher tolerance for heat is often useful.
Scene from the Haithabu (Hedeby) Viking Museum, photograph by Kai-Erik via Flickr (CC BY-NC-ND 2.0)
Cellulose in general is good at retaining moisture, and cotton can hold moisture without feeling wet, which makes it a good fabric to wear next to the skin. However, it’s also relatively inelastic and dries slowly, slower than linen. On the other hand, cotton handles rubbing and bending better than linen.
Cotton also tolerates heat pretty well, although not quite as well as linen: from 120 C upwards the fibers get damaged (reduced strength, yellowing), thermal decomposition starts soon after, and the fibers finally break down at 240 C. Prolonged direct sun can also damage cotton fibers. Cotton burns like paper: it ignites easily, burns fast, and leaves a paper-like ash residue.
Common uses for the softer plant fibers both historically and in pre-historic eras include miscellaneous homewares and garments: wrappings for burials, swaddling and diapers, bandages, underclothes of various forms, tunics and shirts, dresses and skirts, wimples and other headwear.
Underclothes might be made from coarser quality material, since they typically remain unseen, or an underlayer might a combination of two fabrics, the finer being visible while the rougher remaining hidden by overclothes. (Although made from wool, the reconstructed Iron Age Kaarina woman’s underdress from southwestern Finland exhibits this feature.)
How It Happens looks at the inner workings of various creative efforts.


047(js).jpg)
You must be logged in to post a comment.