This post is a part of our Making Clothes series.
Before you can sew clothes, raw material large enough for the desired use must be obtained. Typical larger materials for clothing include leather, felt, and fabric. Leather is reasonably simple to obtain, and felting is technologically one of the simplest fiber crafts. Before fabric, though, there must be yarn. Spinning is the formation of yarn, and the creation of fabric from yarn happens by weaving or knitting.
Spinning and weaving happen more or less the same way independent of the material—for example, there is broadly speaking little difference in handling wool and flax. The desired quality is ultimately the most important aspect affecting the work.
This post will concentrate on weaving and exclude various looping methods, like twining, nålbinding, knitting, or lacemaking. Also not included are braiding or cording techniques, like fingerweaving, Japanese kumihimo, or tablet weaving.
There are more variations in dyeing depending on the material. This post covers some basic principles of dyeing, and the specifics about plant- or animal-based fibers are returned to in later posts.
Spinning
The process of making yarn by twisting clusters of fibers into a continuous length is called spinning. It starts with a bunch of fibers (roving) from which fibers are continuously pulled, twisting the material all the while between fingers.

There are two directions a spinner can turn the fiber when making yarn, clockwise and counterclockwise. The resulting yarns are typically described as z-twisted or s-twisted.

Characteristics of spun yarn vary according to the material used, fiber length and alignment, quantity of fiber, and degree of twist. Yarn with tight or high degree of twist is typically stronger; conversely, low twist produces softer yarn. The amount of twist can also alter the look of the woven surface. (The modern crepe yarn, for example, is formed by hard twisting or overtwisting, which makes the yarn curlier—also variously described as crinkled, crimped, coiled, kinky, or wavy—and usable in textured weaves like crepe fabrics.) Tighter-twist yarn is easier to handle and unravel than low-twist.
In addition, two or more single strands can be twisted together to make multiple-ply yarn. Adding plies adds to the strength of the yarn, but also to the work required. In weaving, warp yarns tend to be stronger, smoother, more tightly twisted, and more even than weft yarns. In Iron Age Western Finland, for example, while weft was often one-ply, warp was two-ply (two z-spun yarns s-spun together).
For most of the pre-modern time, hand spindles were the only spinning tool available. A spindle is basically a long thin stick or another similar piece around which the freshly formed yarn can be wound. They are often used with weights (whorls) attached to the bottom to provide more torque and a longer spin time.

Spindle spinning is also called drop spinning. Another ancient option is supported spinning, with rolling fibers on the thigh.
Spindle whorls are a common archaeological find type from Neolithic, Bronze Age, and Iron Age sites. The weight of extant spindle whorls varies. Switching whorls might be done to affect yarn thickness and quality (finer yarns require a smaller, lighter whorl, for example). Different eras or cultures might also have their own preferred whorl sizes.
Spindles can be used with a distaff. It’s at its simplest a stick or a board that the unspun fibers are attached to. The spinner feeds material from the distaff with their back hand into the front hand for spinning. Extant distaffs go back at least to the Late Chalcolithic period (the Copper Age), around 7000 to 5000 BCE.
The speed of yarn production by spindle spinning varies according to the quality, gauge, and twist of desired yarn, and—naturally—from spinner to spinner. Plying multiple finished yarns together is faster: it takes about half the time of spinning a one-ply yarn. Andean spinners working with drop spindles on sheep and alpaca fibers spin about 100 meters per hour. Modern hobbyist spindle spinners with modern tools but average skill might manage about 50-100 meters of one-ply yarn per hour, while the seriously experienced ones could reach 150-200 meters per hour.

On the other hand, modern reconstructions of garments based on archaeological finds and performed on reconstructed tools seem to involve longer processing times. Some re-enactors estimate spinning speeds of 35-50 meters or 40-60 meters per hour. We can only guess at the speeds Neolithic, Bronze Age, and Iron Age spinners could’ve reached, but 50 m per hour seems a reasonable guesstimate.
Weaving
The origins of weaving are difficult to pin down exactly, but it’s certain humans have also been weaving for thousands of years. At its simplest, weaving means interlacing two strands of material together (with a basic over-some-under-some structure) to form a larger surface.
The earliest cloth was probably netlike. Among the oldest surviving textile fragments, we have for example a piece from Guitarrero Cave in Peru from 12th-11th millennium BCE made from agave or bromeliad leaf fiber (likely twined and not woven). Several woven fabric fragments made from locally sourced oak bast were found from Çatalhöyük in modern Turkey and dated to 6700-6500 BCE. (Bast fibers come from the stem or stalk of the plant, even trees.)
Also at its simplest, weaving can be performed completely with your hands (like in making baskets or simple mats). Certain tools make the work easier and quicker, though.
Weaving takes place on a frame called a loom. The small backstrap loom is an older loom type, still used to make traditional textiles e.g. in Central and South America. In Europe, an upright loom (warp-weighted loom) became dominant until the introduction of the horizontal treadle loom (foot loom). We have evidence of upright looms from Neolithic period onwards (e.g. the Starčevo culture in modern Serbia and Hungary, ca. 6200-4500 BCE). One of the frequent archaeological finds are loom weights. They are tied to the bottom of warp threads on an upright loom to maintain the necessary tension for weaving.

A woven surface is made by crossing two sets of yarns (or threads, strings, etc.) at right angles, as opposed to looping like in nålbinding, knitting, or lacemaking. Warp yarns run lengthwise along the fabric, while weft (or filling) yarns travel across from side to side. A weaver begins from one side, brings the filling over to the opposite side, turns the filling around the outermost warp yarn, and returns the weft to the beginning; this back-and-forth sequence is repeated until the fabric is done. The sides where the weft takes a turn, called selvages or selvedges, become neat as a result of the turning.

At its simplest—called plain weave—one weft yarn travels over and under alternating warp threads. On subsequent rows, the pattern shifts: where the filling went under a warp thread on the previous row, it now goes over instead.
To create this offset, the warp needs to be adjusted between each time the filling is passed from one side to the other. This is done by arranging the warp threads into two or more groups (depending on the weave type). For example, in plain weave every even-numbered thread is in group A and every odd-numbered in B. These groups are temporarily held apart, i.e., they are alternatively raised and lowered to create an opening known as a shed through which the weft is passed. A foot loom uses treadles (a kind of pedal) and harnesses (a kind of a frame) to do the raising and lowering; on an upright loom, the sheds are raised and lowered with the help of horizontal rods (shed-rods or heddle rods) holding the thread groups apart. Complex weaves require more sheds, and the weaver must remember the correct sequence of raising and lowering the sheds to produce the desired pattern.

On upright looms, each new row of weft is pressed close to the previous layers with a weaving sword or beater in order to create an even, tight weave. (Modern treadle looms have built-in horizontal beaters that speed up the process considerably.) So, there are four steps to the basic weaving rhythm: the shed is raised, the weft passed through, the shed is closed, and the weft is beaten into place. For example, on the first row, the weaver opens shed A, passes the filling through, closes shed A, and beats the weft in place. On the second row, the weaver opens shed B, passes the filling, closes shed B, and beats again. And so on.
Working takes place downwards on upright looms, which means that fabric forms at the top and is beaten upward (on horizontal looms, finished fabric accumulates towards the weaver). Typically in earlier periods, a specific length for a specific use was planned and executed on upright looms; weaving long stretches to cut down as needed (what we think of as bolts of fabric) is easier on horizontal looms.
There are three basic weave types: plain weave, twill, and satin weave. (Note that satin does, in fact, refer to a weave and not the material of the fabric. Hence, we talk about cotton, silk, polyester, etc. satin. Sateen is a term sometimes used of cotton satin.)
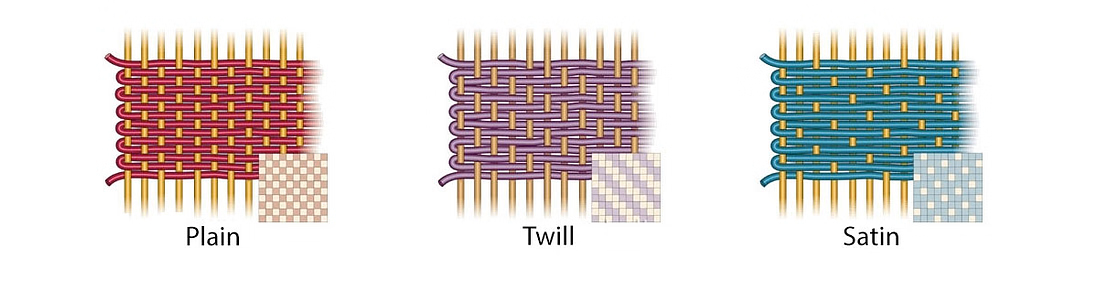
Plain weaves, also known as tabby or linen weave, are the easiest to make and tend to be strong and hard-wearing.
Twills are also durable and have a higher resistance to tearing than a plain weave. They are characterized by a diagonal line (think jeans, for example). The diagonal is formed by floating the filling over one (or more) warp threads and then sliding it under two (or more) warp threads; with every new row, the pattern is offset, which means very particular shed arrangements. There are several ways of making twill weaves—alternating the number of threads floated over, or the placement or direction of the offset, for example—that can be used to create fabrics with different looks and qualities.
Satins are twill-like, but they don’t have the obvious twill-like diagonals, because they have fewer intersections of warp and weft and a smooth, shiny appearance. This is because the floating yarns skip over a larger number of yarns than in twill and this allows more light to be reflected on the top side of the fabric. They tend to be less durable and snag more easily. Often satins are used for dressier or fancier purposes.

There are several ways besides weaves to customize a fabric for a particular function or look. Variations can be created by combining yarns of different materials, thicknesses, textures, twists, or colors. Sometimes more than one yarn can be bundled together and treated as one. Also the number of warp and weft yarns per centimeter (thread count) affects the look, drape, and feel of fabric.
Like the speed of hand spinning, the speed of hand weaving depends on a number of factors, including thickness of yarn, complexity of the weave (number of sheds to manage), thread count, and width and length of the finished fabric. Certain Nordic finds indicate that the widths of cloth could vary from 68 to about 140 cm, but indications of greater woven widths have been found elsewhere in Europe and in Central Asia.
Like with spinning, the weaving speeds Neolithic, Bronze Age, and Iron Age people can only be guessed. It has been estimated that spinning takes 5-10 times more time than weaving. A Viking Age textile reproduction project by National Museum of Denmark that was started in 2018 reached weaving speed about 3 cm per hour on both a tabby and a twill sample 60 cm wide.
Dyeing
At its core, dyeing may sound simple, but in fact it can add to both the textile cost and processing time by a significant factor.
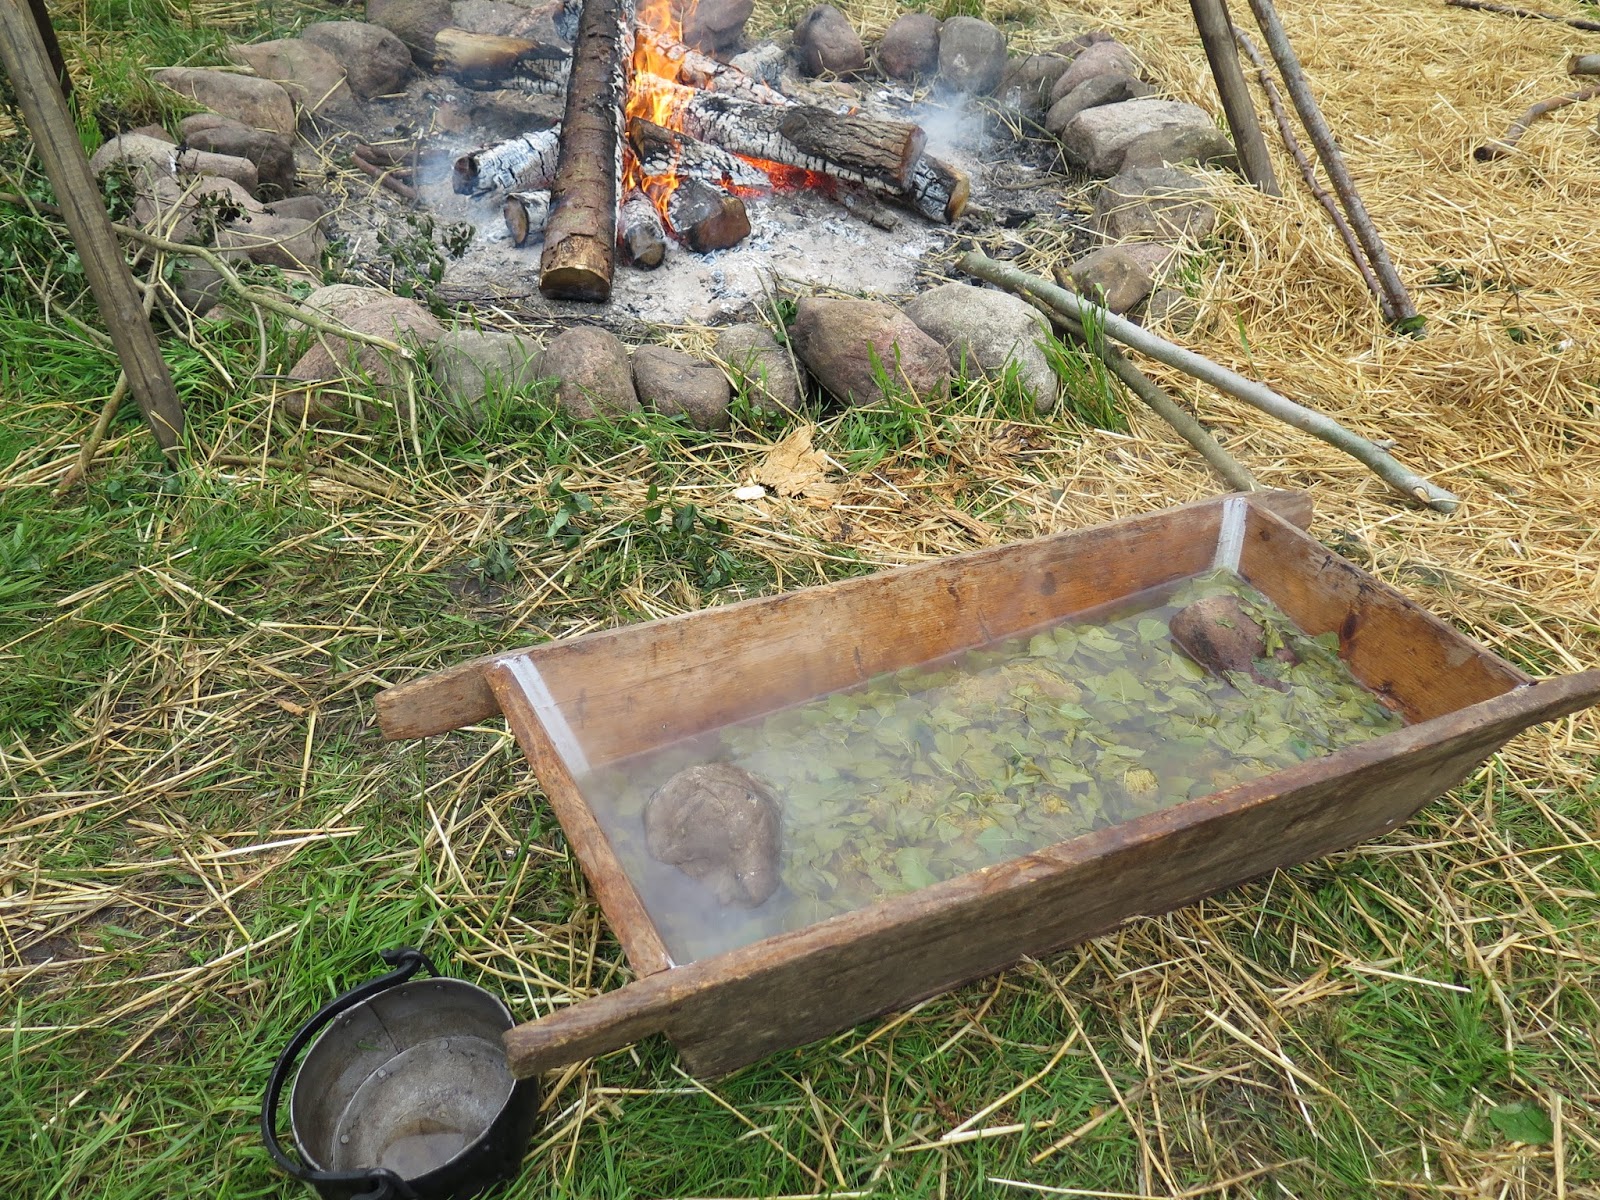
Dyes are extracted by heating the dyestuffs in water, then the dye bath is strained to remove the debris, and finally the fibers to be dyed are immersed, left to soak, and rinsed. Cold dye baths are possible, but they tend to be much slower, so modern instructions almost always give directions for hot baths.
Many natural dyes don’t produce a strong or a long-lasting color (lightfastness, washfastness) on their own, which makes it likely that experimentation with dyes has a millennia-long history. For example, the earliest known use of indigo dye comes from 6000-year-old cotton fabrics from the Preceramic site of Huaca Prieta on the north coast of Peru.
The basics needed for dyeing include equipment for gathering and measuring dyes; containers or vats and strains or sieves for washing and rinsing, for the dye bath, and for storing the dyes themselves; water, soap, and utensils (long spoons or tongs or the like); a heat source; ventilation (for odor or toxicity control); and finally, drying space out of the sun (to avoid premature fading).

It’s also possible to dye a piece multiple times with the same dyestuff (overdyeing) or with other colors to deepen or alter the resulting shade. The yarns for one project should preferably be dyed all at once, however, because it’s difficult to get multiple matching color batches using natural dyes. Furthermore, dyeing vats need to be big enough to immerse the material completely and loosely, otherwise the result may be spotty or uneven.
Natural dyes come from grassy and edible plants (roots, stems, leaves, flowers, fruit; including food waste such as onion skins or carrot tops), trees (bark, leaves, needles, nuts, cones), lichens, fungi, and algae. Some dyestuffs even come from the animal kingdom, for example an aphid, Dactylopius coccus, still used for carmine red, or the family Muricidae sea snails, from which royal purple was derived.
Mordants and assists are an optional step. They help fix the dye to the fiber, increase colorfastness, and influence the range of possible colors. Often they deepen the color, but sometimes they mellow it, or tint the result into a greener or browner range. Mordanting can be done prior to dyeing, concurrently, or after dyeing.
There are a variety of different mordants and assists, and different methods to apply them. Mordants and assists can be mineral-based (e.g., alum, iron), plant-based (e.g., tannic acids or tannins like oak gall), or other substances (e.g., lye, ash, ammonia from urine). In the past, toxic mordants like salts of metals such as chrome, copper, tin, or lead were also used in dyeing.
Dyeing can be done almost in any stage of processing: fibers, yarns, finished fabric, or even a finished garment can be dyed. It’s practical to pick a specific stage depending on the intended use and appearance (e.g., a basic saddle cloth vs. an embroidered multi-piece ceremonial suit) or cost and availability of materials (e.g. locally available birch leaves vs. murex sea snails for royal purple).

For instance, two batches of yarn could be dyed different colors, then one used on the warp and the other on the weft, or woven into stripes on a warp of a third color. Cheaper, locally available dyes could also be selected for the majority of a garment and supplemented with embroidery in a yarn dyed with an expensive import dye.
As if there weren’t enough variables already, fibers will take dye in different ways, i.e. the same dye bath will result in a different shade in silk, linen, or wool. Dyes derived from the same plant can also produce different color year by year, or in different doses, or by different dyeing methods.
In practice, it’s often difficult to inspect dyes in an extant archaeological sample, since multiple ways of dyeing can produce the same result. Modern research methods like chromatography and mass spectrometry have started to give intriguing results, though.
A modern dyeing process using natural dyes includes several steps: washing or presoaking fibers; making and straining the dye bath; cooling the bath (for animal fibers); immersing material and reheating the bath (slowly for animal fibers); simmering (plant fibers) and/or letting materials sit while stirring the bath frequently; rinsing; drying.
If dried plant dyestuffs are used, they need to be soaked, sometimes for days, before making the bath. If mordanting or assisting is desired, at minimum it takes half an hour to an hour, but could also add multiple hours to the whole dyeing process. Merely boiling the dye bath might take an hour, as could soaking the fibers in the bath. Cold dyeing (where the dye bath containing the immersed fibers is not reheated) can take several days.
How long dyeing took for Neolithic, Bronze Age, and Iron Age workers is, unfortunately, extremely difficult to estimate. It’s probable that the whole process took days (achieving royal purple certainly did), possibly even weeks, when all steps are considered.
How It Happens looks at the inner workings of various creative efforts.

You must be logged in to post a comment.